Friday, June 21, 2013

Fixing a Climbing Monkey Toy


It looks a bit like The Island of Misfit Toys around here at times. Toy and parts of toys that just aren't quite right but I don't have the heart to dispose of are in boxes or on shelves all over the place.  A couple of years ago I wrote about a climbing monkey toy that I had made that was perfect except for two thing:


1) It was creepy.
2) It didn't work.

Other than that... PERFECTION!
 
I had fun making him and always though he should have worked so I didn't throw him away. I had gotten the plans for him from a book at the library I used to work at. I switched jobs and returned that and the other 6,743 library books I had checked out and moved on about 6 years ago.
 

About three months ago I found myself returning to the local library for of all things... books! (I know, who'da thunk it?) So on the shelf I see "Making Moving Toys: 30 Quick and Easy Projects to Make" by Pipa and Ian Howes.  I had forgotten the book's title but immediately recognized the cover. It was the book with the climbing monkey plans. (And a bunch of really fun toy ideas not all of which are made of wood. I highly recommend the book.)
 
So I revisited the monkey plans and was gobsmacked to see right there on page 55, that I had, dare I say it, strung my monkey up wrong. GASP. I didn't follow directions and that is why my monkey didn't work. I checked out the book and then spent the next few months in a fruitless search through the Tetris like collection of boxes in our computer room looking for the creepy monkey toy that didn't work. Such is the lot in life of a Toy Making Dad.
 
I eventually returned the book but copied page 55 just in case. Two nights ago, the just in case happened. I found my monkey. There was much rejoicing.
 
So I strung him up the way the book said and I could immediately tell the difference. The black elastic needs to be very tight around the nylon rope on the bar between his hands. It also needs to be strung tightly through the eyelet on the bar between his knees. This pulls his knees up to hands after the downward pull of the rope is released setting up the ratcheting action that allows him to climb the rope.
 
 
I noticed that the monkey's legs were sort of stiff and didn't pivot as smoothly as they should. There is an 1/8" dowel that works as an axle and my guess is that the original hole through the monkey's body wasn't wide enough to allow free motion. The dowel may also have expanded over the years. Time for the patient to go under the knife... or rather, drill press.
 
I used a 1/8" bit to drill out the dowel from either end. I took my time and once it was most of the way done, I used a little pick to scrape the rest out and free the legs. I then took a 5/32" bit and enlarged his hip socket so his legs would swing freely once I put a new piece of 1/8" dowel in there. Piece of cake. The operation was a success.
 
So now he works. He doesn't go flying up the rope like the other climbing toys, but it is pretty cool how it works. I think that adjustments to the tension of the elastic and the type of rope may improve his performance but for now, I can just settle back in the knowledge that Fritz the Creepy Monkey Who Couldn't Climb has moved off the island of misfit toys and can now "hang" with his friends in plain view.
 

Thursday, May 2, 2013

Making a Mobile Shop Cart Using a Car Jack

My space is pretty small, so I knew I was going to have to put my larger, non-bench, tools on wheels. I had seen this amazing post over at Lumberjocks that inspired me. Basically, it is casters mounted to boards on hinges on a wooden base for shop tools. The casters lower with a board that you step on and lock into place. It is a great idea and I really wanted to make it.


When I started though, I realized pretty quickly that the horizontal supports on my base would be in the way and that design wouldn't work. Still, I knew I needed a mobile cart and I would need casters regardless of the final design. I purchased a Harbor Freight 1000lbs rated moving dolly for about $8 and cannibalized the casters. I couldn't buy just the casters for that price. (Lookit! Rusty bolts all the way from China. How EXOTIC!)
All of these types of mobile shop bases are custom sized because there is such a large variety of tool bases and configurations out there. I messed around with a lot of different angles to try and get the original idea to work, but no luck. Then I got lucky when a friend gave me the scissors jack out of her wrecked Honda Fit under the assumption that I would "figure out something to do with it." (Honestly, I get that a lot.)
 
I started to play with that idea and eventually came up with a plan where I had two short levers pointing inward that would get pushed down by a board attached to the jack.  This is the caster flap pulled completely up while I screwed in the lever.


Being, ahem, frugal, I wanted to keep it is as straight forward as possible so the whole build was 2x4 and 2x3s with 3" screws. The "top" that the jack fits into is a little wider than a 2x4 to make sure it doesn't bind when the 2x4 pushes it down. It is attached to the center support 2x4 with 3" screws that alternate so that they don't interfere with each other and the whole assembly is very secure. I did cut notches in the middle support using the jigsaw but other than that everything was just 90 degree cuts
 
Here it is from the front without the jack.
 
 
 And here it is with it. I’m hoping to use the same jack and attached plate for another mobile base since I only have one of these jacks available right now. Clearly, permanently attaching it to the base would be the best option but this is a work in progress.

So here it is extend and below in action. Total cost was under $20 since the jack was free. Still want to make a foot powered one but the effort to raise and lower the jack is minimal


On a side note - When working in the shop, a extra set of paws often comes in handy. Lucky for me the other boy in the house was available to assist with some of the measurements.Many paws make light work.


Monday, April 1, 2013

Putting a Small Workshop Together


Well, this is a different kind of post for me. Until this point I have tried to keep every post about a specific toy that I have built. For some reason though, I've now decided to branch out a bit. Expand my scope so to speak.

Relax (he says to himself and no one else in particular)... it is still about toy making. It just that each post won't always be about specific toys. Sometimes it is going to be a bit bigger picture. The point of the site is so that I can share some of what I've learned while making toys so other like minded/motivated types can pick up some things from my successes and or failures. So that's my justification; it's still about toy making (he says justifying it for himself and no one else in particular.)


My tools have been in storage and there hasn't been a lot of "making" for Toy Making Dad over the last year and a half. It has been a bit of a bummer.

We recently added an addition to our house (Seems redundant. What else do you do with an addition other then add it?) Part of the addition is a utility room. The intention all along was for me to have space in there for my stuff. The idea of having that space at the end of the road helped me through the whole addition process.

We are in the home stretch of the addition and the utility room is pretty much finished and ready to use. As soon as stuff started moving in, I quickly realized a few things; chief among them - the space is actually pretty small. My grand designs of foot powered lathes and a mighty hand built Roubo workbench dashed by the reality of a finite universe. In the words of Charlie Brown - "Rats."

But you know what? It's my space and I should quit talking and start making. I made stuff with no shop. No way I'm gonna complain about a small one.

Here is the general layout of the room:
It isn't perfectly to scale, but you get the idea. The areas in red are accounted for.
So, here is the part that is mine:

I have about of 7'x5' space with about 5' along the other wall. Okay, not exactly the New Yankee Workshop, but it's bright, dry, warm in the winter, cool in the summer and has a bazillion electrical outlets way off the ground. Dig it.

So, I'm now the official owner of a small shop space. Time to start making the most of it.

First up... a tool bench.

Saturday, December 22, 2012

Emergency Jumping Jack Toy Repair


As a bureaucrat, most of the "Can you fix this?" requests I get involve columns of numbers, forgotten passwords and if I'm lucky, misfed media in the high capacity feeder (Oh, you want me to fix a paper jam? Why don't you just say so?)

Anyway, a couple of days ago a friend who works in my department told me the sad tale of a broken ballerina. She has two little daughters and the older girl has a "Jumping Jack" toy painted to look like a ballerina holding a tiny nutcracker. Well, little sister was playing a little rough and it resulted in a broken leg for the toy. (In my house it would also have resulted in threats of a broken leg to the younger sibling courtesy of the older one. Just saying.)

So the obvious question was "Can you fix her?"
Absolutely.
Everything wooden can be fixed.
That's part of why I love making wooden toys.

So, before I show the fix, let me explain the toy. Jumping Jacks are really simple toys that have been around for ages. According to "Easy to Make Old Fashioned Toys" they became popular in 18th century France and are often made from cardboard. (A pattern and instructions for making one out of card stock can be found in that book.)


In general, this is how they work:


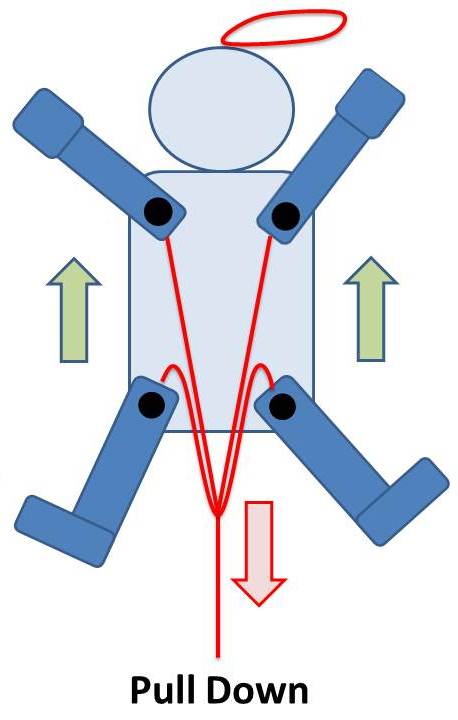
The arms and legs have a have a hole in them and a peg or paper fastening clip goes through them and are anchored to the toy's body. Strings are tied to the tops of the limbs and then another string is tied to the center of both of those strings.

A loop of string allows the toy to be hung from a  hook, doorknob or finger.

To play with the toy, just pull down on the string. The arms and legs will go up and down as the string is pulled and released. Pretty simple, huh? It is fun to watch because as you pull down, the limbs go up.
The difference with the toy I worked on is that the ballerina had a printed plywood front and back so the connecting parts are hidden. Also, instead of one vertical string connected to the two horizontal strings, all four limbs have their own string that all meet outside of the toy in a bead. It allows for a wider variety of moves because the limbs don't always move in unison. Pull more to one side and the limbs on the opposite side move more. Hey, even better, right?

Okay - Enough history and theory. We have a patient to save!


I got the ballerina home and started to give her a look. (Blood pressure was 0/0 and stable... So far, so good.) The limbs pivot on tiny wood pegs that if I had to take a guess would say that they are less than 1/32" thick. (Bamboo maybe?) In the middle is a small block to help support the "sandwich" of the front and back. There was no way to remove the back of the toy without breaking all of the remaining pegs.


I decided that I didn't want to drill out the holes for a replacement peg because then the repair would be harder to hide. Besides, I didn't even have a drill bit that narrow handy. So I bent the end of a very stiff steel wire and started to dig out some of the broken peg. My thought was to use a different, more flexible piece of wire to squeeze in to replace the peg. I lucked out though when the remainder of the peg slipped right out without damaging the rest of the toy.


Then I cut a length of that stiff wire off to form the new peg. The rod was a perfect fit in terms of thickness. I test fitted it a couple of times with and without the leg. Once it was cut  to length, I super glued it in making sure that the leg still swung freely.


I cut the pink end off of the piece of peg that had come out. I intended to use it as a perfect plug. (Insipred by Crawfish's careful re-use of original parts.) Of course it was the size of a pinhead and I dropped it as soon as I went to plug the hole. *SIGH* No fear. A trimmed up piece if coffee stirrer wood and a little pink craft paint got the job done.


And that was that. It ended up being just a little fiddly but I really lucked out and it was a much easier repair than I thought it was going to be. Ballerina and owner have been reunited and all is right with the world. (Well, not really. But some kid is happy to get her toy back so that's good enough for me right now.)


It being close to Christmas and with most of my tools in storage pending the completion of our addition, it had actually been a pretty frustrating time for me. Usually I have a few toy in various states of assembly at this point and this year, nothing. This little project came along just in time.

Wednesday, September 26, 2012

White Russian Cossack Toy

This toy has turned into a bit of an onion for me. Layers upon layers of history, hope, disappointment, redemption, un-redemption (de-demptification?), resignation, and finally..closure. Anyway, I'll begin at the beginning.

A few months ago, a colleague brought her nine year old son to work as part of "Take Your Child to Work" Day. (I asked my wife if her office did "Take Your Man-Child to Work Day" but she refused to answer.) Anyway, seeing as how I am basically a nine year old boy as well, we hit it off. I showed him some pictures of my toys and he said the appropriately flattering things to make me want to make him a toy. (The kid is going to be a master manipulator one day. Just saying.)

I'm in a bit of a bind about all things toy making right now. My house is under renovation with an addition under construction (which will include my first honest to gosh real workshop! Look out world.) As a result almost all of my tools are in storage at a friend's house. What I do have on hand are hidden under piles of displaced kitchen utensils, paperwork and just stuff. I also don't have any place to work. Other than that... all set!

I did have a coping saw, my drill, some sandpaper and a Swiss Army knife. If I had a pair of hockey tickets, three AA batteries and the services of MacGyver, I could have made a satellite transmitter. Lacking those, I decided to focus on a toy that I could make just by hand. Sort of turn back the clock on myself and see how'd I do without a drill press, band saw, or belt sander. Kicking it old school.

So, what to make? Well, I had seen plans for a "Horse with Moving Rider" that I wanted to try in Ken Folk's "Folk Toys" The toy has a classy look and a simple action. There were a couple of things I wanted to change though. Most of the pattern called for 1/4" thick wood. I changed the body of the rider and horse to 1/2" and switched the reins from metal to 1/8" plywood from... you'll never guess... clementine box wood! (I still feel funny about having metal parts on my toys.)

The other thing I wanted to change was the subject. In the plans the rider has a classy 19th Century Guard/Light Cavalry vibe about him but I decided to change that. The kid I was making this for was born in Siberia and I have a family connecting to the White Russian Army during the Russian Civil War. So, a little research turned up a unit of Siberian Cossacks who fought on the side of the Whites (as opposed to the Reds) during the war.

Did I mention that just about all my wood is in storage as well? All I have on hand is a couple of boards from the Ikea's dented bin, a smoked salmon box (given to me after someone else had eaten all the lox... sigh) and of course, a few million clementine boxes.

Ron Hickman invented the Workmate
after using a chair as a work surface.
Just saying...
Almost from the start there were issues. I forgot how you need things like, oh, I don't know, horizontal surfaces to work on when you are cutting and drilling stuff. I have no workbench and my Workmate has finally given up the ghost. I resorted to using the arms of an Adirondack chair I had built about 15 years ago. I got it done, but a lot of lessons needed to be re-learned from my earlier toy making days. The main thing I took away was that technology had allowed me to become sloppy. You need to take your time and cut as accurately as possible the first time because if you didn't have a band saw and belt sander to clean up your mistakes, you'll spend a lot more time on the project. I miss my electricity, but clearly there is joy to be taken in taking your time and working with hand tools.

The lox box wood provided the arms of the Cossack and the legs and sides of the horse. I needed to orient the printed sides so that they would face inward on the completed toy. So a bit of sweat, a few choice words and a nick or two on the arm on my chair and the hand on my arm and presto - assorted Cossack pieces.

I then started mucking with the design to give him more heft.
I wanted him to have a Cossack hat - dare I say a papaha (your vocabulary word for the day) and for his torso to actually rest on the horse and match up closer with the legs that I decided to cut out instead of just paint on the horse. For all three of those additions, I cut the pieces out of 1/8" clementine box wood.

I should have glued the hat and sides on first and then cut out the bodies. Not doing so led to some time consuming tweaks and hand sanding. Live and learn.

All in all, cutting the pieces went about as well as could be expected but I wasn't entirely happy with the cuts. A bit too much splintering on the plywood arms and horse sides, but not awful.

I then started assembly and all was not well. There wasn't a good fit on some of the the pieces. The way the toy works is that the rider's body is a long pole that extends through a hole in the horse's body. Then underneath the horse a cam moves a lever up and down that causes the rider to bounce up and down as the toy is pushed. Should have been simple, but the peg really needs to be smaller in order to move freely in the hole of the horse's body. Also, I did need to re-cut the lever because at 1/2" thick, there was no way it was going to move as freely as I would have liked without hours of sanding. So I made it 1/4" thick and that was too small so I shimmed it out with... yes... clementine box wood and some coffee stirrers. At this point I was pretty sure I was under some sort of Cossack Curse.

Ultimately though, my biggest problem was really an issue with the basic concept of this toy.

Once I made the toy thicker, I crossed a line between making the rider in profile vs making him "realistic." I was moving more from toy towards doll or model and that is not what I wanted. At 1/4" thick, the profile approach was fine but once he became better proportioned and I added his hat and jacket I ran into problems. Specifically with his head. His nose stretched across his whole face. It just didn't look right especially as I added more details to him. Discouraged, I put the toy aside for several weeks.

Early paint job.
Clearly the lad needs some sun.
The nose and mouth were
clearly wrong for the toy.


Luckily, I filled part of this time exiled from the shop with recording PBS woodworking shows. One of them is Rick Bütz's woodcarving show and I got some priceless pointers on starting to carve and whittle. (Chief among them- sharp knives are safer and a lot of little cuts, not a few big cuts, are definitely the way to go.) Newly inspired, I went to work on the Cossack's head and gave him a proper nose and a little definition to his face. Not perfect but seeing as how the first time I tried to carve a little bear five years ago I ended up with a carved thumb and  something that looked like a pig, I considered this quite the leap forward. If you've never seen Rick Bütz's show or books, they are definitely worth checking out. I highly recommend them.
 

So better, but still not right. He looked far too fresh faced to be a Cossack. So I painted a beard of sorts on him. (Honestly, this toy took so long to make, he could have grown his own beard.... if he was actually alive... and not made of wood.) I also gave him a slight scar on his left cheek to toughen him up a bit. He is a Cossack after all.

Since his reins were not bent metal, I'd worked on the spacing of his arms to give enough clearance so they could move without any problem. The reigns are glued to an 1/8" dowel that serves as a bit in a hole right behind the horse's mouth. I drilled the hole slightly large than 1/8" so that it could rotate freely. The other ends of the reins are glued to 1/8" dowels that pivot in the rider's hands. Again, through slightly larger holes.

I moved to final assembly and attached the wheels, reins, and a saber. As with the arms, 1/32" balsa spacers make sure I'm leaving enough space for the moving parts to move freely. I could use washers, but again, I'm staying clear of metal on my wooden toys right now. I then tweaked up the paint and sprayed him with a gloss acrylic finish.

Done.

Finished.

Never again...

Oh who am I kidding? I love this guy! We've been through a lot. If he wasn't a Cossack, I'd give him a hug.

Here is a quick video of him in action:


Just Saying...

While we don’t necessarily need more objects, we just might benefit from more making.
- John Dunnigan

Followers

About Me

My Photo
Regular guy who likes to make stuff who lives with a very patient wife, three daughters and three cats.