I drink my coffee black. True, there are times I feel that I'm missing out on a whole world of fun and flavor. On the other hand, my coffee is always the way I like it. That tradeoff seems worth it. Anyway, The other day at work, I'm heating up my 37th or 38th cup of the morning in our office kitchenette when I looked over at the pile of coffee adulterates next to the sink. Next to the four kinds of artificial sweeteners (what a country!) there was a cup full of wood coffee stirrers. "Hmmmm, free wood..." I think to myself.
Well, I'm pretty sure you are familiar with these little guys. Most people think their use is limited to stirring beverages and making the occasional scaled down popsicle-stick pagoda. Well, most people aren't insanely cheap, toy obsessed, perpetual 12 year old boys. I, however, am.
Honestly, I think the stirrers are made from wood that doesn't quite make the cut for toothpicks or matchsticks. They aren't real uniform or strong but they are plentiful. Their quantity is their quality. Holding a few of the stirrers in my hand I fanned them out and started thinking about some possibilities. I looked at them from the side and the idea of a propeller immediately came to mind.
About 20 years ago my sister gave me a toy wooden helicopter. I still have it. It consists of a carved prop with a dowel down the center. You spin it in your hands and then give it one big push with your right hand and it flies several feet in the air. This is actually a really old folk toy and lots of toy making books out there have plans for carving your own. I decide to try and make one from the stirrers.
(A bit of honesty here. This is actually the second wood helicopter I've built. A couple of years ago I made one out of... you'll never guess... clementine box wood! But that is another story.)
So beginningat the beginning, I took a bunch of stirrers and sorted through them to find seven or eight "good" ones. (Again, a relative term when applied to these guys.) I need six for the propeller but I found out early on that these split easily when you are drilling them so a few extra will almost certainly be needed.
The sticks are 7 1/2" long, 1/4" wide and oddly enough... about 1/20" thick (I'm guessing they are really metric. Just saying.) I taped the best ones together and marked the midpoint. I used my hand drill and a 1/16" bit to drill a pilot hole. I then used a 1/8" bit to finish the hole through the middle of the sticks. Honestly, a few cracked and split a bit, but no worries. I had a few extra and there is glue on them anyway. (I used the drill press on the second one I made and it was a much easier. Right tool for the right job, I guess...)
Now the easy part. Just insert a 1/8" dowel through the center hole and push one of the stirrers about an inch down. Hold the dowel so its top is pointed at your nose and you are looking down at the 1/4" wide stirrer. Put some glue on the surface of left side of the top part and the right hand side of the bottom part. (You are gluing the surfaces of the stirrers, not the thin sides.) Now insert the dowel through another stirrer and press that stirrer on top of the first one. Be sure to overlap half of its width of the first stirrer. The top will overlap the left and the bottom the right. You'll repeat this process of gluing and placing each stirrer until you use all six.
With the "pitch" of the prop this way, the surfaces will fly up if you launch it by pushing off with your right hand. If you really want to make a left handed coffee stirrer helicopter (and who am I to judge you if that is your dream) just glue the top to the right and bottom to the left to change the pitch. As you assemble each layer, press them together and use clothes pins as mini clamps until the glue dries. You can do a two or three layers at a time this way.
In all honestly, you could probably just glue the dowel in place now and take it for a "spin." However, not being someone who is willing to leave well enough alone and being someone who just got a WHICKED COOL belt and disk sander, I felt the need to round off the edges and smooth it a bit and then finish it up by hand.
The first stirrer is farthest to the left.
The last one, farthest to the right.
Not perfect, but that really isn't the point.
So now, in the spirit of complete honesty, I have to admit that at first, it didn't work. When I tried to fly it the propeller was clearly generating thrust, but it went every direction but up when I launched it. RATS!
One of my daughters very nicely tried to explain to me that maybe coffee stirrers simply weren't made to be toy helicopter parts. However, I wasn't willing to accept defeat so easily. For centuries humans had dreamt of coffee stirrer power flight and I wasn't gonna let some silly thing like physics get in the way. So, after thinking though it, I realized that the problem wasn't the propeller. The problem was the central dowel. It wasn't long and or heavy enough. I dare say, I had a lateral stability problem. I swapped out the dowel for a longer one (about 8" long) and it immediately flew like a champ. (Note to the Nobel Committee - When you cut the check, "Toy Making" is two words.)
The dowel could probably be a little shorter, I'll tweak up the design in the coming weeks, but as it is, it's fine. It flies higher and is much lighter than my other two wooden helicopters. This was a simple toy to make and it would be hard to imagine a less expensive one. I might see about cranking out a half dozen of these "dragonflies" some afternoon.
When I was young, my friend Paul had a Japanese Pachinko machine. If you've never seen one of these in action, you are missing out. Little metal balls plinking back and forth down a maze of little pins. It is really something to see. Think of it as the love child of a modern pinball machine and the "Plinko" game from "The Price is Right" that grew up to be a slot machine. Anyway, it is fascinating to watch and fun to play with.
I really liked that sound and feel and always wanted one. Once I grew up, I found out that stuff like that COSTS MONEY! (Who knew?) So for Christmas about seven or eight years ago, I decided to make something similar for my daughters.
Before I share how I made mine - time to put that BA in History to use and share a little pinball history.
It all started because French soldiers brought a game called Bagatelle to America during the Revolutionary war. It caught on and stayed a part of the new country. Basically, think of it as a mini pool table with more holes. It has wood pegs blocking the holes to make it more difficult. Here is an old political cartoon with President Lincoln at a bagatelle table. (Jeeze, it must have taken cartoonists weeks to make these drawing. Makes you wonder if their editors were ever like, "This is great stuff, but the war ended six years ago so it isn't quite as topical as we'd like...)
Eventually smaller tabletop bagatelles (begatellei?bagatelleum?) became popular as a saloon or parlor game. Metal pins replaced the wood pegs and it became more of a gravity game with a ball pushed to the top of the board and it finding its way through a maze of pins to various holes. In 1871 the patent was granted for the first plunger for launching the ball (replacing the stick) and pinball was born.
Pinball machines honestly have a bit of a shady past. They had a bad reputation partially because they were seen as games of chance and not games of skill. (The "flipper" didn't even come around until after WW2.) Free game tokens could be traded back in for cash, so they were in effect slot machines. Seeing as how those are illegal in most places, so were pinball machines. In fact, they were illegal in NY City well into the 1970s.
Study your notes on this. There will be a quiz on it next Thursday followed by everyone having to watch The Who's Tommy and pretend like they liked it.
Now on to making one.
This was one of my "proof of concept/leap of faith" toys. I knew what I wanted at the end and knew what I had on hand to make it. When you make stuff like this just take your time and think a little ahead. You'll do fine.
I had a piece of 1/2" thick plywood that was 11" wide by 17" long. Most interior/furniture plywood will have at least one smooth side. Just be sure you are using a smooth side as the playing surface. Next I did my measurements. One thing is that you want to minimize stuck marbles. The average size of the marbles I have lying around is 1/2" so I knew the space between pins needed to be at last that wide. I also knew that I don't want any marbles to have a path to just fall straight through without some plinking around. So... I set up a pattern starting 1" down the board and marked each point with a pencil where the pins/nails would be in rows with offset columns. Each nail in the row is one inch from the next nail. The next row was one inch down and then offset by 1/2" with pins one inch apart. I then had a strip of 1/2" wood as my depth guide and just started tapping in the nails one at a time until I finished 1" from the bottom. It ended up looking like this:
168 3/4" brads each driven in 1/4". I know... I'm freakin nuts!
Honestly, you'd be surprised how fast this went. One thing that made it easy was that I was just working on a flat piece of board at this point. I had not attached the sides or bottom yet.
Next came the sides and bottoms. I had some 3/8" thick by 1 5/8" wide strips that I used for the frame on three sides. Across the top I used a piece of 1/4" thick x 1/2" wide trim to cover the end of the plywood. No fancy joinery here. I just used end buts, a little glue and few brass nails to hold it in place. Then I laid out the scoring area by cutting pieces of the 1/2" trim and gluing them on edge one inch apart across the bottom. Printed numbers on paper glued to spots finished this off.
I wanted this to be played anywhere so I added an adjustable leg to the back that lets you set the angle that you are playing at. I drilled a 1/4" hole into a 2 3/4" piece of the side/bottom wood. I then glued it off center on the back of the board. After it had dried, using a thumb screw, washers and a butterfly nut, I attached a 17" piece of that wood that I had rounded off its top.
The higher the angle the faster the ball drops. At the lower angle the balls are less likely to leave the table while falling. You can drop pennies and dimes as well and they are fun to watch, but they tend to get stuck on the 1/4" dividers at the bottom. (So maybe use thinner dividers or no nails directly over the holes.)
So there you go. Here it is in action.
We've played it as just highest score with each marble, high score with five marbles or "first one to twenty." It has held up pretty well over the years. Just the occasional nail straightening or the support arm being re-glued.
So the last things to do are make the sponsons, assemble, paint and finish the toy. (And play with it before I have to give it away.) All in all, not so bad and not too many surprises ahead.
The sponsons on the sides are a defining feature of British WW1 tanks. I want them to move but still be sturdy. It would be nice to have the gun barrels move left and right as well as up and down, but at this scale they would have been a little fragile and probably a bit droopy. So a few doodles and a test cut or two later a pretty simple solution came up.
I took another piece of 2x3 and drilled a 3/4" hole through it with a spade bit. Then I took a 3/4" piece of dowel and set it down into a "V" made out of... you'll never guess... the little support corners from a clementine box! (Clementine boxes really are the onions of the frugal toy making world.) I drilled a 1/4" hole about half way through that dowel and then inserted a piece of 1/4" dowel into it. (Don't glue it into place yet though. If you do, you won't be able to make some of the cuts coming up.)
Drill all the way through and make sure you have a thick enough piece of scrap under it.
Simple jig that makes it easy to hold any size dowel in place. The triangles are glued down.
I cut the large dowel down to about 1 5/16" with the 1/4" hole being in the middle. I didn't want too tight of a fit because I want the gun to rotate without binding. With the barrel dowel in place I checked the fit and marked the widest point in the arc of the barrel rotation and then made straight cuts with the bandsaw. I tested the fit and made sure the larger dowel could rotate freely but not be pulled out to the front. Then I trimmed the sponson to the rough width and length.
I rotated the barrel through 90 degrees and marked where I need to make the cuts.
Here is the "rough cut" of the sponson along with the 1/8" plywood that will make the roof and floor.
I used clementine wood that had printing on it for the roof and floor. I just made the printing inward facing because often that paint will "bleed" through the acrylic craft paint I use to finish toys. (Note to self - look for non-toxic primer.) I have plenty of clear wood I could have used, but I wanted to leave a little proof on a hidden inside part of the tank that this had been built using food box wood. It might seem psycho, but I felt like it was a little "shout out" to Homer McNeil and his toys.
Use enough glue to get a solid seal all the way around. Use clamps and be sure not to get any glue on the dowel that holds the barrel. It needs to be able to rotate freely.
Don't glue the barrel in until after the top and bottom have dried and you have finished shaping the sponson.
I used a combination of the bandsaw and belt sander to get the final shape I wanted. There was a wide range in the shapes of the sponsons on the British tanks depending on the model number and the number of guns it carried. The next one I build might have a smaller dowel and barrel towards the back to house a machine gun. Anyway, mine doesn't match an exact version, but it captures the general idea.
Obviously, you'll need to make two sponsons. Make sure that your cuts and sanding match up. Now you can glue the barrels in.
Here we go, the home stretch. I painted it olive drab with the red and white recognition stripes at the front. I glued and clamped the sponsons one at a time so that I could be sure to line them up how I wanted them. I did change the location of the nylon clacker to the back of the tank and held it in with a small brass screw. It sounds better clacking "in" rather than out on the gear and it looks like it will be less wear on it. (Actually, I'm gonna keep an eye on it to see if it holds up. I might experiment with a thin metal one instead.)
A scornful look from a black cat isn't required at this stage, but it seemed to be help.
The infamous "clacker" in place. Cut from a surplus nylon Venetian blind slat.
The large letter/number combinations at the front of the hull were unit identifications in WW1. The smaller numbers at the back were tank serial numbers. I personalized the tank for my friend's kid by making his birthday the serial number and used a play on his name for the unit ID. I painted the letters and numbers using a very fine point brush and... yes... a toothpick.
The tops of the tracks are painted grey.
I did add small driver shields and painted small slots on them.
The last thing I fixed was the machine gun. I really didn't like how the 3/16" dowel looked. To fix it I drilled a 1/16" hole in the center of it and then expanded that hole with a 1/8" hole (doing it like that prevented splintering) and then put a piece of 1/8" dowel into that hole.
After the painting was done, I gave it a coat of spray acrylic and then gave it a test run on the floor.
All in all, not so bad. Nothing too tricky (although there must be an easier way to make the clacker... just saying.) Without the paint, I think this could be knocked out over a weekend without any problem.
Here are the rough plans as a cutting guide. BE SURE TO SET THE IMAGE TO PRINT LANDSCAPE! The tank tracks should be a little over 8" from tip to tip. I tapered the back of my sponsons but like I said, I might add smaller guns at the rear on the next one. (And there definitely will be a next one.)
I want the tank to make a noise as it is pushed. This is the "clacker" idea I mentioned earlier. Looking at other toys and thinking about cardboard in my bicycle spokes (I never would have ruined a real football card) I knew I needed to make a geared wheel with something flexible that intersected it at a right angle. As the wheel turns, that flexible something would make a clicking noise with each tooth on the wheel as it passed.
I used a 1 1/4" hole saw on a 1/2" piece of oak. (What? Toy Making Dad using using real wood? Scandal! -I know, but in fairness, it was a piece of scrap and this part really needs to be made out of hardwood.) This fit perfectly in the space I had on the axle between the other two wheels.
I used to have a job where one of the "guiding principles" was "Why make it simple, when you can make it complex?" With that, I present the 5 step program that takes about 4 times as long to type as it does just to make the silly geared wheel:
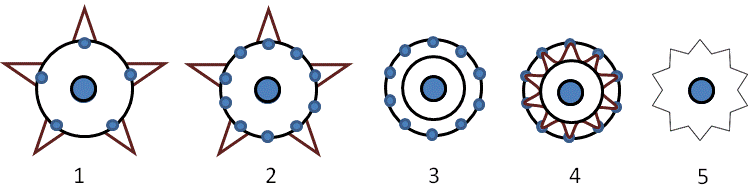
Take a 1 1/8" in diameter by 1/2" thick wheel with a 1/4" axle hole and place it over a drawing of a five pointed star and mark the points of the star on the wheel.
Give the wheel a turn so that those marks were now in the valleys of the star points, and then mark the points again.
Draw an interior circle on the wheel at the depth you want each gear gear to be.
Draw "v"s down from one point to the interior circle and then up to the next point for all ten marks.
Carefully use a band saw or a coping saw to cut out the gear.
If you use the band saw, make a simple jig with a 1/4" dowel sticking up out of a board. Then set the wheel down flat with the dowel through the hole. Carefully complete the cuts by moving the jig into the saw and then pulling it back out, rotating the wheel to the next position and then repeating all the cuts until you are done.
This is what I ended up with. Pretty cool but still functional and sturdy. Since my wheels are inside the toy and I don't have a lot of extra room, I test fitted and assembled the wheels and axles before I glued the sides to the hull.
The 4,865th test fitting
Mmmmmm, glue sandwich...
I tested the clacker with a small piece of vinyl and I got the sound I was looking for. I won't mount the vinyl until the very end though. I glued and clamped the center hull to one side of the tracks and let it cure overnight. I painted the inside areas that I would not be able to get at once the tank was assembled. (I also gave that area a quick spray acrylic seal.) Then I put in the axles and glued and clamped the other track side to the hull.
I wouldn't be able to paint inside the wheel wells if I waited until the tank was done.
Clamped up and curing. I tested the alignment several times to be sure the tank rolled evenly.
In researching British tanks in WW1 there seems to be some real question as to exactly what color they were. Most of the museum examples around the world have them in either an olive green or a darkish brown. The brown is pretty classy honestly, and my next one will be that color but I went with the olive green for this one. Mainly because that is what I saw in my mind when I first started thinking about how to build this.
I did add white and red recognition stripes to the front of the tank because they were used in WW1 and on British armor up through the early part of WW2. While not to scale... they seem to class it up a bit. I used regular masking tape. (I would have used the blue painters tape... IF I COULD HAVE FOUND IT!!!)
So, all we have left are the sponsons with cannons and final assembly and painting. (If you just can't wait... you can see the completed sponsons in the background of the picture above.)
I edited the tank image down to just the side view using MS Office Picture Manager but obviously, you can use any image manipulation software or the photocopier of your choice. I then resized it using PowerPoint because it gives a very easy inches scale to follow. (I used the profile I found on http://www.the-blueprints.com/ but I'm not showing it as part of the template I'll include in Part 3. As cheap as I am, I not willing to take other people's work and pass it off as my own.)
I decided to use some IKEA bed slats that I had been given by a friend. (These are not to be confused with the IKEA bed slats my in-laws gave me...) The slats are 3/4" thick and 2 5/8" wide. I cut two pieces about 9" long and then "sandwiched" both pieces together using double sided tape. I sprayed one side with spray adhesive, let it sit for about five minutes and then applied the image. (By letting it set up for a few minutes, it makes it easier to remove the paper later.) Then... off to the bandsaw and the belt sander!
If you can't get the cuts to be a smooth as you like either because of inexperience or having not the right blade; don't despair. Try and make "relief" cuts perpendicular to your main cuts. You can always smooth things later (especially if you have a wicked cool belt sander.)
These are the finished tracks. I drilled two 5/16" holes along the bottom that will hold the axles for the wheels. The holes are 2" apart on center and 5/16" on center from the bottom. (Did I mention how wicked cool belt sanders are?)
I cut the hull out of one piece of 2x3 (which we all know is really 1 1/2" x 2 1/2" grrrrrr). I had a general idea of what I wanted the shape to be, so I just drew it directly on the wood. Again, I'm not trying to make a scale model. I'm trying to make a recognizable toy. The picture above shows the axle holes already drilled, but actually I test fitted my hull against one side of the track to be sure my axle holes were in the right place before I drilled those holes.
Looking at historic photographs and line drawings gave me the general layout I was looking for.
After cutting out the general shape, I test fitted it and cut the wheel wells.
I drilled a 3/16" hole right in the center of the front cabin of the hull (facing forward) about 1/4 deep. This will hold a dowel that will be the hull machine gun. You could make the dowel 1/8" but it might be a little fragile for how it is going to be played with. Besides, I've seen some pictures and documentation that said this machine gun was sometimes a "Lewis Gun" which had an oversized cooling sleeve around the barrel.(Hey, I thought you said you said you weren't trying to make a scale model and that you were just trying to make a toy... - QUITE VOICES! I have to use my History degree every once in awhile!!!)
Okay. Let's test fit it and see how we are doing. I took some 1/4" dowels and slipped 1 1/4" in wheels on them. These will go inside the tank body so that they can't be seen from the outside. (By the way, some of the wheels marked as 1 1/4" at craft stores are simply not that size at all. A reliable source for the correct size wheels is http://www.craftparts.com)
Grab the double face tape and then line everything up, give it squeeze and see if it rolls.
The space is going to be tight for the "clacker' I want to place between the wheels, but we can still give it a try.
It rolls well and is starting to take on the classic tank look I'm shooting for.