Whirligigs are something that have always interested me. They have that great folk art vibe and are almost always "whimsical" in nature. I have a couple of books of plans but haven't managed to build one on my own yet.
Well, that's not entirely true. I haven't managed to successfully build one yet. I worked on a penguin a couple of years ago and carved a couple of surprisingly elegant flipper/wings for the little guy that simply refused to work. After a year on the shelf, he was sentenced to the burn box out of frustration.
A few months ago a friend asked me if I would be willing to try and fix "Dee Daw" for her mother in law. Dee Daw is the name for their wooden goose whirligig. Apparently Dee Daw had a long, much beloved history with this family but he (she?) was on his last legs (wings?) I said I couldn't guarantee success since I had failed at my last attempt at a whirligig but I was willing to give it a shot. Dee Daw came home with me a few nights later and waited patiently in my shop for his turn.
So fast forward to a couple of weeks ago and I found myself lacking in pressing home and family projects and completely absent any excuses for making sawdust. So it was time to unpack Dee Daw and see what the deal was.
In short... both wings were broken and at least one piece was missing. He was also missing an eye and his finish was very rough and flat. Dee Daw had clearly seen better days.
It looked like either his wings had been repaired before or that had been made from glued up boards and were not solid pieces. In either case, I decided that they couldn't be fixed and needed to be replaced.
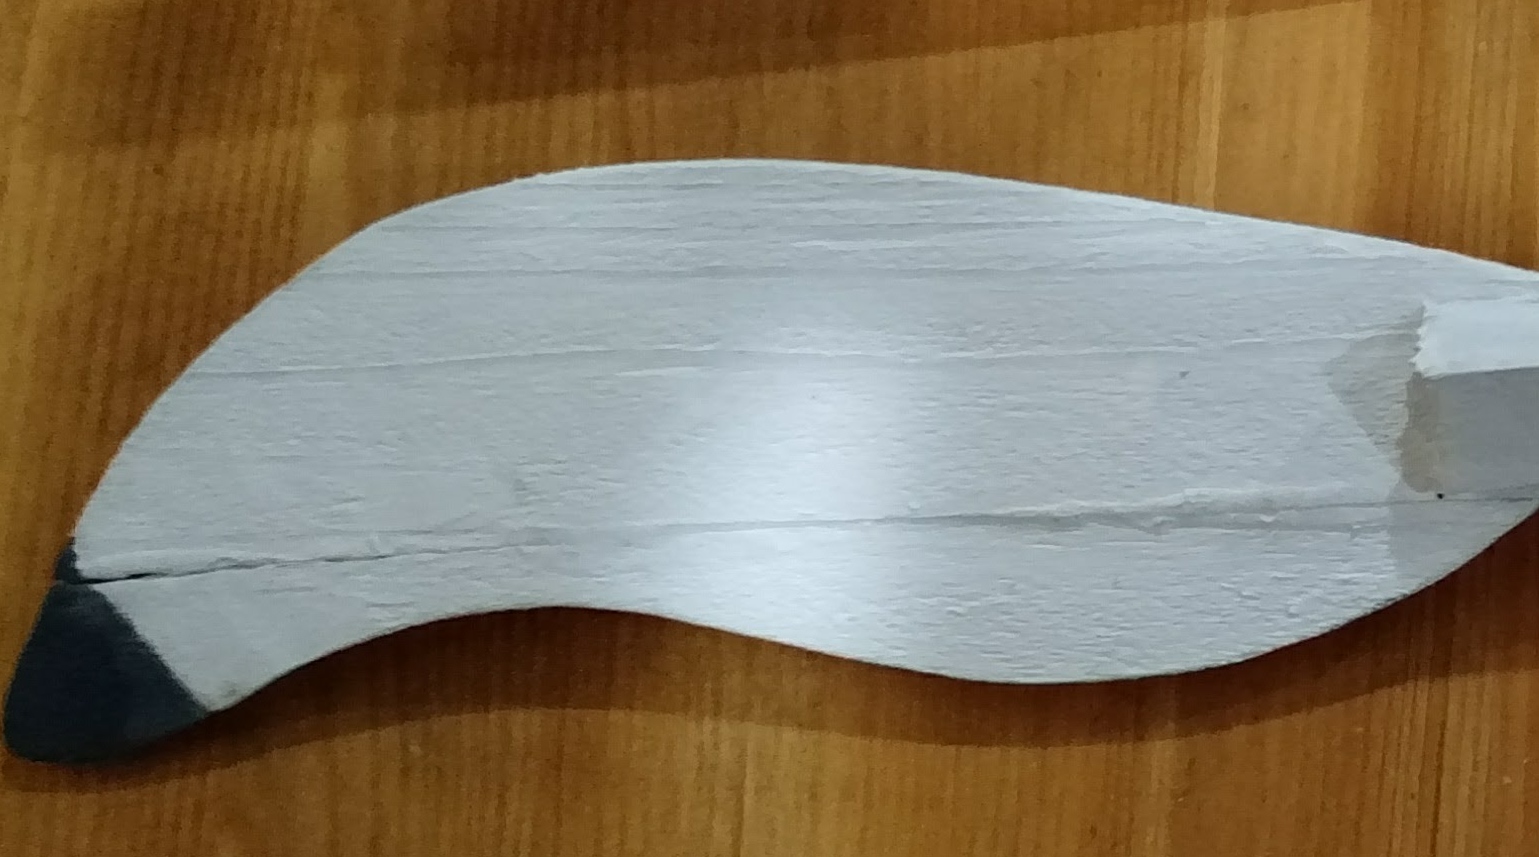
Each wing is made of three pieces. Two flat blades and a central wood block. I took the wing that was detached from the wooden block and used it to trace a template. I allowed for the piece that had broken off inside the block.
I used 1/4" thick solid boards from the bottom of a wine crate for his new wings. I couldn't see 1/4" plywood holding up to the weather but... what do I know? Anyway I cut the wings out in pairs on the band saw to save time and to help ensure balance on the wings by using pieces from the same board for each pair of wings. (Each wing shown here actually has two layers for a total of four blades.)
The original central block on Dee Daw was 1" square and 3 1/4" long. There is a diagonal cut 1/4" wide and 1" deep on each end that are angled opposite each other. There is a hole through the middle and there is a #10 2 1/2" wood screw with #10 stainless steel washers on either end. It is really a bit of genius design here in that the screw has a smooth shank that allows the wing to freely pivot around the screw with a minimum of resistance. Although this is in direct contrast to that fundamental principle of web design - "Why make it simple, when we can make it complex?"
At this point I noticed that the diagonal cuts on these wooden blocks weren't...GASP..perfect! ASTONISHMENT!
You mean to tell me that folk art whirligigs don't need to be engineered to within 1/1000th of an inch and perfectly balanced?
Well, apparently not. Clearly the more precise you are the better but close enough appears to be... well.. close enough.
So with my new found frame of reference and my recently created outdoor workshop, I realized I can experiment. Every moment spent on a project doesn't have to show in the final product. If it works, great. If it doesn't, well I learned something and there is always the fire pit to destroy the evidence. (That's why everyone has fire pits now. Way more cost effective to destroy your own evidence.) I took a piece 3/4" thick wood and cut and ripped it to be 3/4" square and 3 1/4" long. Not the exact dimensions of the original but now I realized it didn't have to be.
I had a jig made out of the 45 degree angle blocks from what else... clementine boxes! I marked off the areas to cut and the correct depth.
I just held the block in the right angle formed by the "v" of the two clementine box corners glued to a plywood base. (You could also use a dovetail or fret saw and a vice to achieve the same thing.)
The width of the cut was 1/4" to match the wings. I made several passes with the saw to nibble away at the pieces and then used a file to clean up cut and get a flat bottom. I then drilled the holes through the centers to fit the shinny new #10 wood screws.
I should also note that I made cryptic little scribbles on the blocks to keep then aligned to match what was originally on Dee Daw. This block has "RI" written on it to mean "Right Interior." The angles on the wings and their relative position to the other wing are what leads to the contra-rotating motion of the wings. Later when I painted the assembled wings, I pressed in a L and a R on the interior sides of these pieces with a small screwdriver. That way the marks showed after paint covered my pencil marks.
I sanded the wing blades to make them smooth but also to get the thickness correct. I mainly used my stationary belt sander for the thickness part but earlier on I used a palm sander. A few years ago I picked up a 60' long blue roll of "non-slip shelf liner" from a dollar store (just saying.. it actually only cost $1) Works great for me. It is soft and the dust falls into the mesh and is easy to clean. Wood doesn't shift around while I'm sanding. I should buy more...and just cover every surface in my house with the stuff. I see no downside.
I was careful to "sneak up" on a good fit and then used an exterior wood glue to secure the wings.
After letting the glue dry overnight, I put the wings back on and took him out for a test spin.
The wings started spinning almost right away in a moderate breeze. I was super happy. Now it was time to repaint and finish him.
The wings were straight forward. I used craft store acrylics and got great coverage.
Hey... do I not own the greatest coffee mug in this or any universe? Handmade by the amazingly talented and super nice folks at Claymonster Pottery. I smile a lot in general, but especially when I drink from that mug.
Now... back to our post.
When I first took a look at him, I couldn't tell if he had a finish that had worn off or if was just a flat finish that was showing some age. The other possibility is that he was intentionally finished this way to give him a more folksy look. Whatever the case, the owner asked me to give Dee Daw a fresh shinny new paint job.
I used some filler on the more obvious cracks and sanded everything before I painted him. Most of my paints are flats (I find it hides hides brush strokes well) and then I add a shinny finishing coat. This time the grey (or was it gray?) paint was only available in "Multi Surface" and it goes on a little thick and tends to be a little shiny on its own. No worries though. Once dry I covered him with brush on Rust-oleum Ultra Cover Clear Gloss. I usually use a rattle can of acrylic but I felt like he needed a more substantial coat to stand up to the elements (This is my first outdoor toy. Never thought about toys standing up to the elements.) Note - It works great, but it does run if your aren't careful... and maybe even if you are.
Last thing was to glue on nice new shinny eyes and take him out for a test flight.
He works great. My friend and Dee Daw's owner were both super happy with how he turned out.
I learned a lot, it was fun to work on and I can't wait to give making one from scratch a try.
For the visual learners - Here is a short video of some of the repair steps and Dee Daw's test spins.
I managed to go the whole post without a history of whirligigs or mention of the word's derivation.
However, I can't legally complete this post without noting the technical assistance Dr Teddy provided. While not a fan of birds... ESPECIALLY BIRDS ON HIS LAWN... he is a professional and takes his job very seriously.
When the patient was being worked on...Teddy provided the Cat-Scan.
Later while he napped he had the intern he is mentoring keep watch.
She also helped me test gravity in our dining room by pushing various parts off the table.
He is mentoring her well.
Forget about Farm to Table. I've finally entered the world of Log to Toy. These grasshoppers were the first toys I've made where the main parts of the toy were from a log as opposed to some finished piece of lumber I had acquired.
Here's how it happened...
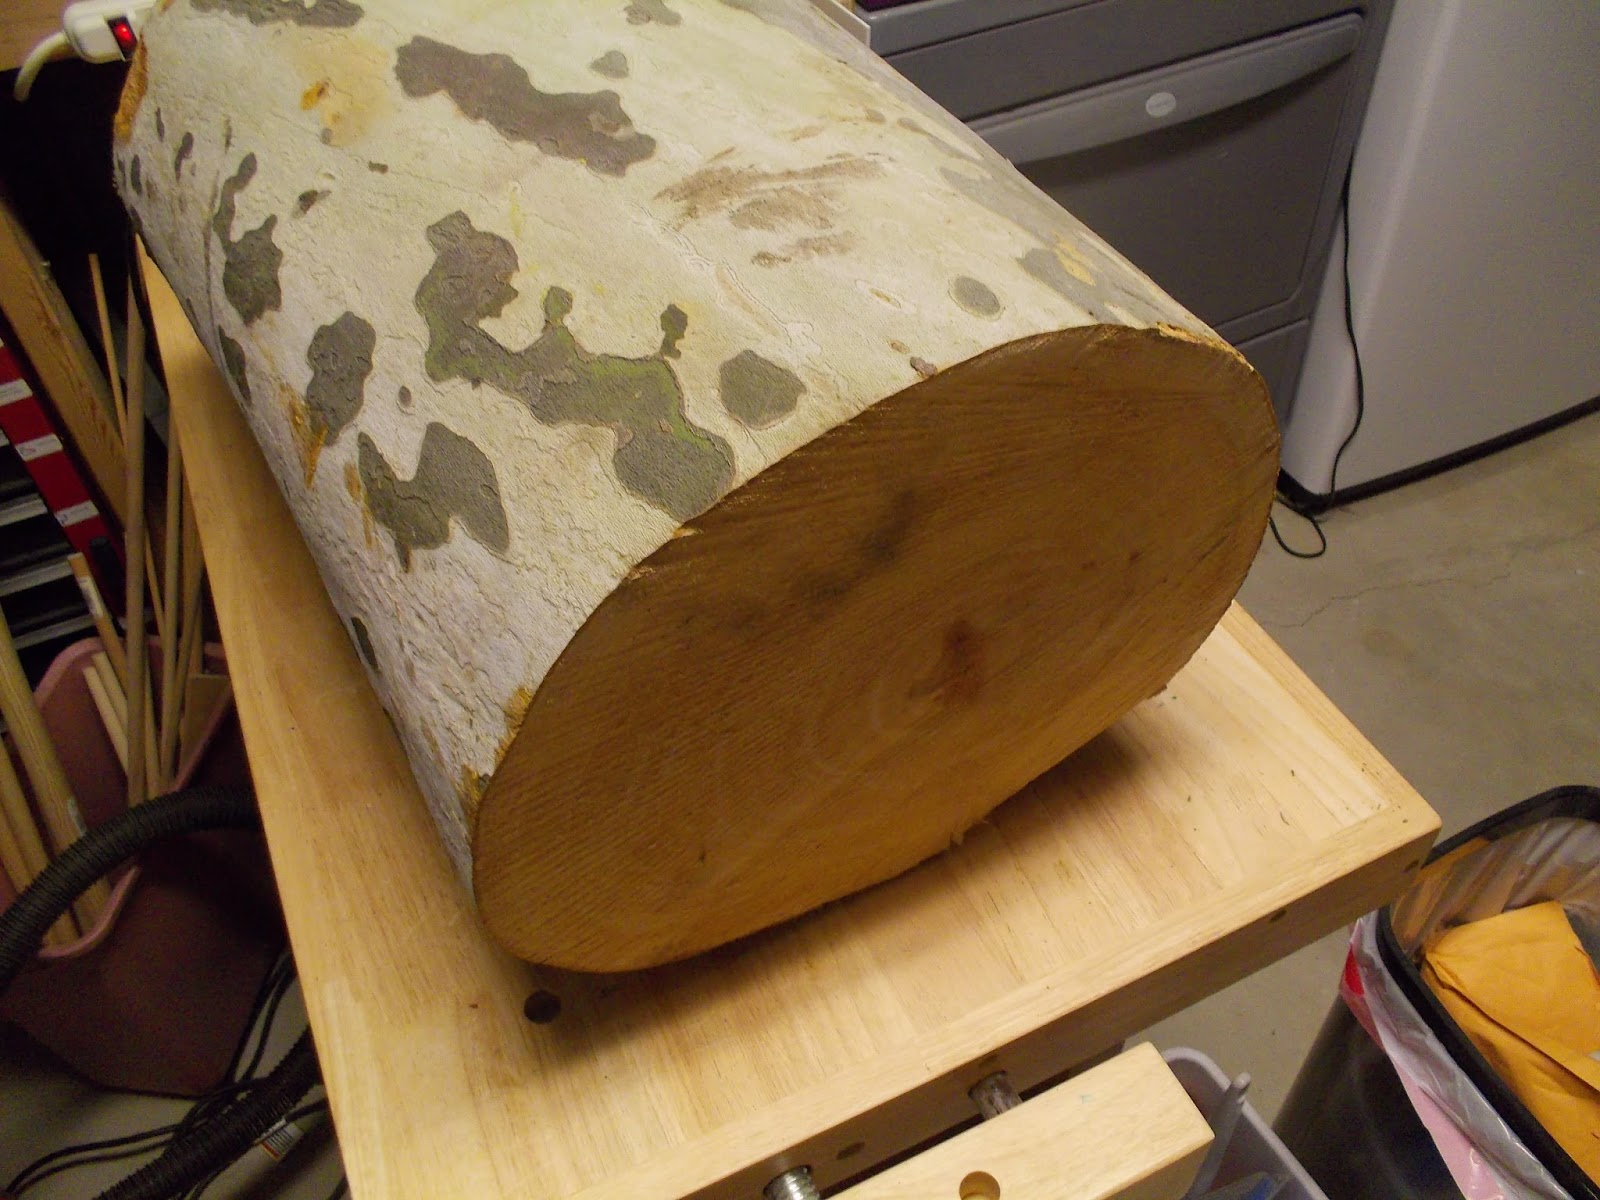
About a year and a half ago I was walking to my car and passed a public park. There on the sidewalk was a big pile of rather substantial Sycamore logs. They had just been cut that day and were piled up to be turned into mulch or some such inglorious fate.
I pondered a few moments about what I would actually do with one of those logs. A quick interwebs search on my phone (crazy world huh?) said that Sycamore are pretty much impossible to split but good for carving spoons out of. Ummm..okay. I am sorta interested in learning to carve and spoons are a pretty practical thing to have around. So next thing I know I'm hauling a 20"x 14" log that must have weighted 85 gazillion pounds into my car.
When I carried it into my house and announced I was going to make a spoon out out it, Mrs Toy Making Dad gave me the "his descent into madness is accelerating" look. I painted the ends with latex paint and set it aside. I dreamt of spoons and ladels that night.
As to those know-it-alls who say that Sycamore can't be split I say... you guys are absolutely right!
The crime scene photo
It was an exercise in brute force and pure stupidity to eventually get it in half. It took the better part of a weekend using a chain saw, a maul, iron wedges, hand saws and wooden blocks. I'm not kidding, nothing like using the wrong tool for the wrong job. It was a mess but it gave me something to work with. It is the nature of the grain that prevents it from splitting. It also makes it warp like crazy when drying unless the pieces have been quartersawn.
The only thing better than having a high quality bandsaw is having a friend with a high quality bandsaw. So I dropped Crawfish a line. I whipped up a simple sled to fit his amazing Rikon bandsaw and then he and I spent a few hours in his dungeon cutting the log into boards. It was a ridiculously good time.
Somehow we managed to quarter saw some of the sycamore and my jaw, and his claws, just about hit the floor. Wow. The grain was like nothing we had ever seen. (Well, at least not on this planet.) So that got me thinking. (Which is usually pretty dangerous.) Yes, I can experiment with spoons but the pattern on some of the 1 1/2" thick board was pretty amazing. Seemed a waste not to show it off.
When I got the wood home, I sealed the ends with some Anchorseal that Crawfish generously shared with me. When it was one big log, I had just used some leftover latex paint. It is super important to seal the end grain of green wood with SOMETHING otherwise you will get end grain checking/splits. Don't believe me? Check (hehehe see what I did there?) out these two sides of the same piece of wood. The splits showed after just a couple of weeks.
Sealed
Not Sealed
So I stacked and "stickered" (put spacer sticks to allow airflow around the wood) the sycamore boards and put them on a shelf out of the way to dry over the next few months.
Fall rolled around and my neighbor sold me his Jet Joiner/Planner combo machine and one of the first things I tackled was the sycamore boards. I decided to make some grasshopper toys out of them since Christmas was coming up. (Here is a post on how I make those toys.)
According to my moisture meter the boards were ready. The Jet was super easy to use and in no time I had some sycamore boards that were exactly 1 1/4" thick and had a side that really showed off the quartersawn grain pattern. The wood cut and sanded fine. I had one piece that showed a little tear out on the grain but I'm not ready to give up on that piece quite yet.
I experimented a bit with finishes again. From bottom to top these are unfinished, beeswax and mineral oil and then Danish Oil "Natural" along with some beeswax and mineral oil. Beeswax and mineral oil is non-toxic and easy to work with.
They toys went together super easily. The legs ended up being red oak left over from my neighbor's shed. He got an amazing deal on 1x6 boards from a family run sawmill on MD's Eastern Shore. Whole 8' boards were just a few dollars each and it really goes to show the price difference between buying finished lumber and "making your own." Yes it has to be dried and surfaced, but still, this is a hobby and I've got time. I don't always have money. Just saying.
I've gone on several times about how much I like using the beeswax and mineral oil finish for toys. I believe these wheels are birch (I get them from Woodworks Ltd.) Look at the difference it makes and all without any fumes or added stains.
So not 100% Log to Toy but I don't see myself turning pegs that I can buy for 5 cents each or making dowels anytime soon. Maybe I should raise my own bees though to get that beeswax...
As always, my quality control supervisor assisted with this project. Here he is performing a cat-scan on the log and trimming a superfluous branch.
Not sure it would have been possible to make these without his help.