So a friend of mine was retiring and cleaning out her office.
She drops this box off at my desk and says, "Hey, you like making stuff. Good luck with this."
Mmmmm, okay. Why the semi-ominous "Good luck...?"
Lots to like here.
It's a toy. (Two of 'em actually)
It needs to be built
It's scorpions which are wicked cool
The box says "Build it, Wind it, Race it" an I've always wanted to be a professional scorpion racer!
It was free!
What's not to like? How hard could it be?
I broke them out for a father/daughter snow day activity. On first glance, the kits are pretty impressive. Two sets of instructions. Two sets of thin vinyl parts that look to be laser cut. The pieces are very crisp and popped out of their sheets pretty cleanly. I was going to build one at the same time little worked on hers. After all the instructions say "Ages 6+" and she is well north of that now.
We'll that lasted about 5 minutes before she looked at me like I was a complete loon.
The pieces are small.
Really small.
The instructions are tiny and hard to read.
Not just because I am an old man who has to hold things farther and farther away to read them (which by the way, I can't believe is actually happening to me!)
By using dark shaded CAD images, it is really freakin' hard to tell what is supposed to go where.
The pieces go together but the images are so dark and textured, they are not clear enough to always see exactly what is supposed to go where.
I say that as a guy who has built A LOT of models and assembled all sorts of fiddly little toys over the years. You have someone engineer these little toys to amazing precision but it would break the bank to print it on a large sheet of paper?
So having said that, they can be assembled and look good when done, but I found the walking action to be clever but disappointing.
So if you are trying to put one of these kits together, here are some photos that may help.
I missed a step or two here and there but you should get the idea if you are stuck on a step.
In the end, like I said, they go together well and look cool, but you can't be guaranteed they will walk properly, let alone "race."
(If you lost the original instructions, here is the link to them. Clicking on the pictures below will open up large images for you to view and that may more helpful for you anyway.)
Step 1 and 2
It will look like this assembled.
Step 3 and 4
Step 5
Step 6
Step 7
Step 8 and 9
Step 10
Step 11
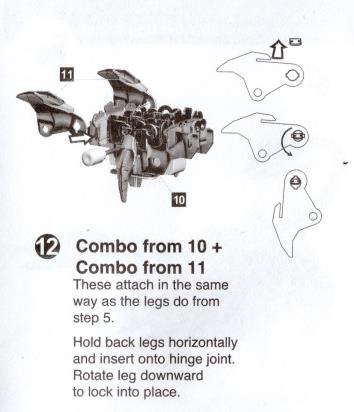
Step 12
Put the legs from Step 11
on to the body assembly
from Step 10.
Step 13
Step 14
Step 15
Getting the tops on and the clips
on the legs
Step 16
Not the Crawl...THE CLAW!
Step 17
I think I skipped ahead to 18 on
this step since the back plates
are already in place.
Step 18
Note how the claws actually
attach in step 17
Step 19
Insert tail joke here
Step 20
Okay, there you go.
As a puzzle these are pretty cool and the design and engineering behind them are neat.
The legs really crawl and give it a bug like look but the motors seem inconsistent. The two I got in the kit do not wind for anywhere near the same number of turns.
.
The movement aspect of the toys is just sort of spazing out in place or maybe walking in a circle for a few seconds. At least with the two I built, no way could you ever race them.
A Push Puppet.
You know, "The dog/cat/giraffe toy that falls apart when you push the button on the bottom toy and then springs back like magic."
Ohhh... THAT push puppet!
And no, I didn't know they had a real name until I started this project.
A few weeks ago a friend asked me to repair her dog push puppet. It had broken awhile ago but she managed to keep hold of all the pieces except for a small bone that the dog used to carry in his (her?) mouth. I was excited to give it a shot. I had played with a few of these over the years, but never actually had one myself.
Unfortunately the memory card where all the repair photos were on became damaged before I could download the photos. So all I have are post procedure pictures and a couple diagrams to share.
Cucciolo
But first - I have to use that BA in History at least once a year.
These toys have been around since 1932 when Walther Kourt Walss invented them in Switzerland.
Taking the first letters from his name he came up with WAKOUWA. That is the name they are still referred to as in some places and with collectors. The Kohner Brothers started making them in the US in the 1947 and they were a huge success. Later, imports from Italy and Germany began coming to the US. Until the '60s they were almost always made of wood but sometimes had a metal or plastic base. (Even now when I see them imported from China, they are often made of wood and not plastic.) By the late '60s though, most of these toys were being made with plastic and often featured licensed characters.
Alright, history lesson is over. Quiz on Tuesday.
This is basically how push puppets work and how I think they are assembled:
The base is hollow. There is a disk, connected to a spring, that has four strings attached. The strings pass through small holes in the base and up through the leg segments and body of the toy.
By applying some, but not full pressure to the disk, the strings can be tied off or glued into their final spots and trimmed up. With this toy, there are two holes in his neck for the strings through his front legs and two strings attached at the base of his tail for his rear legs.
Once the strings are secure, the clamp can be removed and then the toy will stand rigid since the spring is pushing down, keeping the strings taut.
To play with the toy, press the button "up" and the tension on the strings will lessen and the toy will partially or completely collapse. By not pressing right in the center, the toy can be made to dance or wiggle from side to side.
The little dog that my friend sent is all wood except for his fabric floppy ears and of course the metal spring and a plastic/vinyl cap on the push button in his base. He had no marking on him but he looks EXACTLY like some Italian push puppets from the 1960s that I have seen online.
I decided to not completely restring him and just added some very strong but still soft nylon upholstery thread to the existing string and make the repair that way. Besides not being 100% that I could get him properly reassembled, I also felt like the more I could leave it original, the better.
As described above, I used a C-clamp to keep some pressure on the disk and then I used a "Fisherman's Knot" to extend his broken string with this new thread. It work great and seemed plenty tight but I went ahead and put a few drops of "super" glue to the knot as insurance.
The neck of the dog is a separate segment. Both of the stings from the front legs go through the body and up through the neck and are tied off. I tied the new string to the old one, trimmed off the excess and put a drop of super glue on it for good measure.
The dog's head wasn't actually attached to the neck as far as I could tell except by pressure. I didn't want to glue it since I figured it could hinder future repair efforts. However after about the third time his head popped off when I was testing him, I decided to use just a little hot glue. I figured that it doesn't soak into the wood and would probably still be easy to get off if needed. You can see a little "string" of hot glue in this picture this I just hadn't cleaned off. Wow... digital cameras don't miss much. This is also a decent shot to show how the threads are strung through the toy.
And just for anyone who has to fix the OTHER end of a toy like this, this is how his tail is attached. The strings must be glued into the holes in the tail. I just don't see any other way to secure them there.
Last thing was to make and paint the bone. The hole in his mouth was just a little over 1/8" round so I know that would be the size of the dowel for the shank on the bone. In my bins of assorted but not always sorted parts, I had some 5/16" beads that have a 3/32" hole in them. I don't have a vice for my drill press and no way was I going to hold something that small in my hand while I tried to drill it so I kicked it old school. Behold... my grandfather's "egg beater" hand drill with 1/8" bit. I used the vice on the end of my workbench to hold the bead and the drill worked like a charm. No effort and a clean cut. What can I say, right tool for the right job.
The bone was finished with white craft store paint and then given a coat of gloss acrylic. After it dried, I assembled it in his mouth, glued the ends to the shank and touched up a couple of spots. All set.
Here is a video of the repaired toy:
These toys have a lot of character. They seem to come alive with just the slightest bit of pressure on their base. It was a fun project to work on. I got to learn a few things and most importantly my friend got her toy back and working.
It got me thinking about how this sort of toy's action could be applied to an automata toy. Hmmmmm.... stay tuned.
This is a toy that looks complicated and seems like it demands real precision to work at all but honestly, it's pretty straight forward and there is a bit of wiggle room in the measurements. (Wiggle... caterpillar... never mind.)
The toy came together over several weekends of trial and error. Hubris and the occasional flying disk o' death off of the miter saw delayed me but I'm fairly confident that one of these could be made (but maybe not painted) in a day without too much grief.
So to begin at the beginning...
A few years ago I made my first caterpillar automata. Ultimately, I called it "The Very Hungry Caterpillar That Photographed Very Poorly." It was a gift for one of my nieces and it is still working today.
It had just six cams and I used five large beads for the body and a "doll's head" for, well, the head. There was nothing to prevent the body parts from rotating on their shafts, but that was fine.
I didn't have a set of plans for that one. It was just a proof of concept that became a finished toy. That was the same approach I took with this one; build and test as I went along.
I needed to make a toy for little one's school auction and for a friend's newborn. I wanted to try my hand with some more automata and I recently came across Woody Mammoth's version of a caterpillar toy on the web. I really liked the look of his, so it seemed like the way to go.
So... for those following along at home; here is Cam Terminology 101:
The cam is attached to a rod that runs through the pivot point. When the rod is rotated the cam turns pushing the follower up through the slide and then allowing it to fall as it continues to turn. So rotary motion gets turned into reciprocating motion. The follower is aligned over the pivot point and is always in contact with the cam.
Now on to the build.
The cams were cut from 1 1/4 pine dowel on the miter saw and are exactly 1/2" wide. They need 1/4" holes through their face that go all the way through. I used a jig that I usually use to drill offset holes in wooden wheels. The center of the hole is 5/16" from the edge.
I used a pine dowel for these. One batch seemed to have rougher edges that splintered a bit but a lot of factors can go into that. They cleaned up fine.
The case for the caterpillar was made with 1x3 (3/4" by 2 1/2" actual) pine boards. The case was 8 1/2" long (8" is fine as well). The holes on the top piece need to be right down the center and I used a 9/32" bit to allow clearance for the 1/4 dowels that will be the followers. I drilled the hole for the head at 2" in from the end and the first hole for the body at 3". After that, it was 8 more holes each 1/2" from the last one. ( I finally got smart and set up a template for this.)
The front and back pieces were 3" tall. They have a 9/32" hole right through their very center and need to line up since the rod need to go through both holes.
Once the holes were done I glued one end to the front of the top and the other to the back of the bottom to make two "L" shaped pieces. I put a coat of beeswax and mineral oil on them but was careful not to get any on the surfaces that will need glue during final assembly.
The followers are 2 1/2" long pieces of 1/4" oak dowels (I needed to make 10 of these.) The base of the followers were little pine blocks I cut that were 1" long (left to right looking from the front of the finished toy), 1/2" tall (up and down) and about 7/16" thick (front to back.) They each have a 1/4" flat bottomed hole drilled in them about 1/4"deep (using a Forstner bit.) I found that drilling the holes on either end of the stick already cut for thickness and height and then cutting to length on the band saw was much safer than cutting it to final size and trying to drill the holes.
I glued the followers together with their bases and checked that they moved freely in the holes on the top of the case. I hit the holes with a rat tail file to make sure nothing was too tight.
I took a 10" or 12" piece of 1/4" oak dowel and did a quick test to see where I could start safely lining up the cams. I glued the first one in place and then it was just a matter of lining up the next cam so it was a little off line from the previous one but glued to each other. I had a 1/4" difference in the rotation for each one.) The less the difference, the smoother the action. When finished it looks like a screw. I did double up on the cams for the head. I matched them for this one. On the other one I just cut one dowel 1" thick instead of 1/2" and drilled the offset hole in it. The thin disk at the front is used to help lock the rod in place so it doesn't move too far back and forth once the crank is attached.
So then there is some test fitting to see where that locking disk needs to be placed to have the followers line up with the cams. By having the bases of the followers be a little less that 1/2" wide and the cams exactly 1/2" wide, it makes it run pretty smoothly. I hit a few of the "feet" of the followers on the beltsander once or twice just to give a little more room. Once I was happy with the alignment, I glued the locking disk in place and the top and the bottom together.
Now the the body...
I purchased a 1 1/4" diameter poplar dowel from the local old school hardware store. I used it for the 7 main body segments. I also cut one disk each from a 1 1/8" and a 1" dowel for segments toward the tail. Each segment needs to be just short of 1/2" thick. The poplar dowel splintered a lot less than the same sized pine dowel I used for the cams and had a smoother,denser end grain after it was cut and sanded.
I experimented with using my bad saw to cut the disks and I was very disappointed with the results. They weren't a total wreck but they required a fair amount of time on the belt sander to clean up and they were uneven. After a little slip cost me a part of a fingernail, I finally was like "Not worth it!" I cut a new set using my power miter saw with a stop block. Super easy and super precise. One note though...DO NOT lift the blade while it is still spinning! I spit three of those little disks across that shop at about Mach 4 before I learned that lesson.
The body segments need a 1/4" hole drilled in the center of their edge for the followers. I used the same jig as for the cams but turned up on its side. I used a Forstner bit (thank you once again Benjamin Forstner) to get a nice flat bottomed hole. I made the holes 3/8" deep. You could probably make this with 3/16 dowels but I find the birch dowels I get in that size to be pretty fragile. Your millage may vary.
I used a pre-turned craft store piece called a "doll's head" for the caterpillars head. (It is 35mm across, about 1 7/16"ish.) I plugged the hole of what would normally have been its base with a length of 3/16" dowel and then drilled a 1/4" hole for a follower to fit in. I used the same jig as with the other pieces and left the dowel long so I could use it as a handle while drilling. Once the hole for the follower was done, I trimmed the dowel flush and sanded that part flat.
The smart thing to do now is to test your body segments to make sure they don't rub against each other too much AND THEN paint and finish them even though they will be slightly thicker once painted. Just be sure to keep the segments in the same order you test fitted them. 1/16" one way of the other really makes a difference. You don't want too much wiggle room between the pieces though since it can allow the followers to get out of alignment and interfere with each other. Don't let this stress you out. It's a toy. Not the engine on an airplane. It will work fine.
So, with all the pieces cut and tested, I painted them and gave them a coat of spray acrylic. Yeah... it looked a little creepy but this setup let me paint the full disks and have them dry out of the way. Also let me use the spray acrylic on both sides at the same time. It was a big time saver.
One thing I added before the acrylic was a shapely rear end for the caterpillar. He just didn't look right with a round head and flat butt so I rounded off a 3/4" dowel, painted and glued it on to the 1" body segment. Now... baby got back!
Last thing in the crank. I used a 2" hole saw to cut a disk of 1/2" pine from a board, sanded it up and painted it to look like an orange. A little 1/4" dowel became the stem/handle for the crank. It goes in the 1/4" hole where the leaves are.
I tested the fit again and the glued the body pieces on to the followers. Almost done.
I trimmed the front and back of the rod and added the handle. I left a tiny bit over 1/2" of the rod protruding from the front to attach the crank on it. I made sure to leave a little space so it wasn't constantly hitting the case. I guess a washer is called for here, but I tend to stay away from metal in the toys if I can help it.
Okay then.. all set.
Crank
Head
The full critter
And here he is in action. I did the cams slightly different on this one with an extended cam in the tail (not needed) and a longer cam for the head that worked as the locking piece as well.
My guess is that most parents of the last 40 or so years are familiar with Eric Carle's "The Very Hungry Caterpillar." It's a great book and it has a very distinctive style. I could never match it but I figured I could capture the vibe by using some of the same colors and shapes.
People really like the pleasant wiggle and whimsical nature of this toy. It really has whet my appetite for simple automata. Stay tuned.
In clearing off the digital camera I noticed some of my weirder projects from the last year or so and I just wanted to share some of the oddness. It is only semi-toy related but as I accelerate my journey from eclectic tinkerer through to eccentric old man, I feel it may be worth a post.
In short - as an allegedly semi-handy guy who makes some weird stuff, I for some reason get asked to make a lot of weird stuff for people. Funny how that works out.
These are "Bronze Medals" for an Office Olympics I helped organize over the summer. The little plastic medallions had "Yo Gabba Gabba "stickers on them before I hit them with the metallic spray paint. (The medallions were in the discount bin at the Party Store which is odd since Yo Gabba Gabba is basically timeless. It will always be good advice to not bite your friends.)
Bottom of a clementine box as my spraying surface. Each medallion was sitting on a plastic soda cap. Oddly enough, this was the second time in eight years I had done this.
I gave myself a Silver Medal for the performance because I probably should have peeled the stickers off before painting them. Oh well, Gold in 2020!
This one is sorta bittersweet. I've made a couple of toy boats and want to make more but these weren't intended to float. They were for a funeral. (YIKES! Way to bring us down Toy Making Dad!)
A colleague at work asked if I could make centerpieces for the memorial service of the brother of a long time friend of hers. It took me about an hour and a half to make the prototype but maybe only 2 or 3 hours to make ten of them. I actually made templates and it was easy to see how things like jigs and design simplicity are key to "mass" production.
The bases were 1x4 pine with a small cabin cut from the same wood and shaped on the beltsander. Masts are oak dowels. The finish is beeswax and mineral oil.
He had been an avid sailor and the family placed a sail on each mast with details about his life and a quote printed on it. Guests seated at the tables got to bring the boats home as a keepsake. They were very well received. The colleague's friend ended up paying me twice what I asked for making them. Toys make people happy even in sad times.
One other weird bit about "mass" producing these boats...
My eyes see this:
But my History degree sees this:
Okay, and now about the gnome. The Risk Management Team in my office was putting on a "Safety Month" for our organization and they wanted a mascot. I have NO idea how the idea started but someone suggested a garden gnome with a traffic cone on his head.
Seriously.
So my buddy Bill hands me a gnome and a little plastic traffic cone and says "Hey, toy-man. Can you cut off his hat and glue the cone on?"
Well, the short answer is "Yes" but as a wise freshwater crustacean once told me, "Why make it simple when you can make it complex?" Besides... I know I was told it was okay to cut his old hat off but I'd much prefer to fix things and not break perfectly fine things. (Also, not that I'm a gnome guy...but he seems alive and I don't want some weird woodlands curse coming down on me.)
So I cut a square of 1/2" MDF to be the base of the cone. I then took a hole saw that was pretty close to the diameter of the hat and got to drilling.
Once it was done, I then kept doing trial fits to see what still needed to be removed. I used a rotary tool to taper the hole and custom fit it to his head.
Success.
So I painted the base black with some gloss black latex paint and then proudly brought it back into the office to show we had achieved cone-headedness without destruction. Bill thought it looked great but the team felt that the hat HAD to be orange to be a "real" traffic cone.
Seriously.
So I picked up four different shades of orange from the craft store and settled on... well "Orange" and four or five coats later, viola! A non-broken gnome wearing a traffic cone for a hat.
I had Teddy perform a "Cat-Scan" to make sure it was safe before returning it to the Risk Management team.