
Emergency Jumping Jack Toy Repair
 As a bureaucrat, most of the "Can you fix this?" requests I get involve columns of numbers, forgotten passwords and if I'm lucky, misfed media in the high capacity feeder (Oh, you want me to fix a paper jam? Why don't you just say so?)
 Anyway, a couple of days ago a friend who works in my department told me the sad tale of a broken ballerina. She has two little daughters and the older girl has a "Jumping Jack" toy painted to look like a ballerina holding a tiny nutcracker. Well, little sister was playing a little rough and it resulted in a broken leg for the toy. (In my house it would also have resulted in threats of a broken leg to the younger sibling courtesy of the older one. Just saying.)
So the obvious question was "Can you fix her?"
Absolutely.
Everything wooden can be fixed.
That's part of why I love making wooden toys.
So, before I show the fix, let me explain the toy. Jumping Jacks are really simple toys that have been around for ages. According to "Easy to Make Old Fashioned Toys" they became popular in 18th century France and are often made from cardboard. (A pattern and instructions for making one out of card stock can be found in that book.)
In general, this is how they work:

A loop of string allows the toy to be hung from a hook, doorknob or finger.
 To play with the toy, just pull down on the string. The arms and legs will go up and down as the string is pulled and released. Pretty simple, huh? It is fun to watch because as you pull down, the limbs go up.
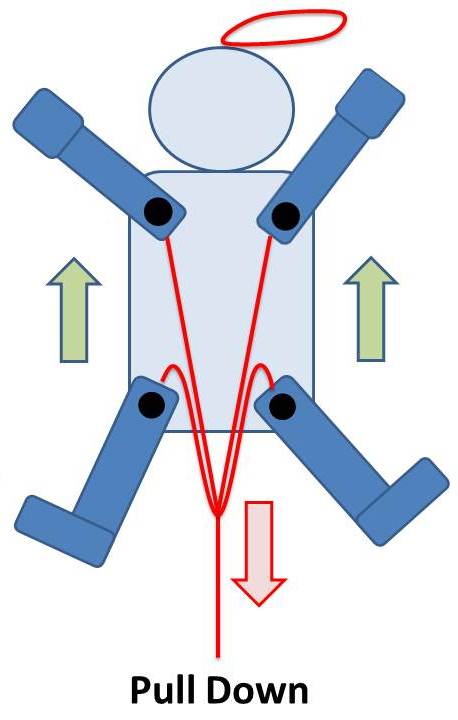
Okay - Enough history and theory. We have a patient to save!
 I got the ballerina home and started to give her a look. (Blood pressure was 0/0 and stable... So far, so good.) The limbs pivot on tiny wood pegs that if I had to take a guess would say that they are less than 1/32" thick. (Bamboo maybe?) In the middle is a small block to help support the "sandwich" of the front and back. There was no way to remove the back of the toy without breaking all of the remaining pegs.
  I decided that I didn't want to drill out the holes for a replacement peg because then the repair would be harder to hide. Besides, I didn't even have a drill bit that narrow handy. So I bent the end of a very stiff steel wire and started to dig out some of the broken peg. My thought was to use a different, more flexible piece of wire to squeeze in to replace the peg. I lucked out though when the remainder of the peg slipped right out without damaging the rest of the toy.
Then I cut a length of that stiff wire off to form the new peg. The rod was a perfect fit in terms of thickness. I test fitted it a couple of times with and without the leg. Once it was cut to length, I super glued it in making sure that the leg still swung freely.
 I cut the pink end off of the piece of peg that had come out. I intended to use it as a perfect plug. (Insipred by Crawfish's careful re-use of original parts.) Of course it was the size of a pinhead and I dropped it as soon as I went to plug the hole. *SIGH* No fear. A trimmed up piece if coffee stirrer wood and a little pink craft paint got the job done.
And that was that. It ended up being just a little fiddly but I really lucked out and it was a much easier repair than I thought it was going to be. Ballerina and owner have been reunited and all is right with the world. (Well, not really. But some kid is happy to get her toy back so that's good enough for me right now.)
It being close to Christmas and with most of my tools in storage pending the completion of our addition, it had actually been a pretty frustrating time for me. Usually I have a few toy in various states of assembly at this point and this year, nothing. This little project came along just in time.


Hello Daniel. No sé, si te acuerdas de mi, soy la persona que te pidió ayuda con los dinosaurios.
ReplyDeleteMe alegra, que puedas realizar algún proyecto, a pesar de que no este terminado tu taller.
Ahh te invito a que visites mi blog.Estoy trabajando en el cocodrilo, que sale en el mismo libro que hiciste el cosaco.
Estamos en contacto!
I have two little ones, both boys, and since I love making stuff (and am cheap), I spend a lot of time fixing toys as well. Sounds like the only difference between you and I is that I prefer to work in metal... wood and I don't seem to get along too well. Anyway, great work! This was my latest toy repair adventure: http://joyofprecision.tumblr.com/tagged/toy%20repair
ReplyDeleteOf course, for fixing toys, metal toys goes easier. However, I still prefer wooden toys for the kids.
ReplyDelete