
Making a Scorpion Rising Wind-Up Toy/Puzzle

She drops this box off at my desk and says, "Hey, you like making stuff. Good luck with this."
Mmmmm, okay.
Why the semi-ominous "Good luck...?"
Lots to like here.
- It's a toy. (Two of 'em actually)
- It needs to be built
- It's scorpions which are wicked cool
- The box says "Build it, Wind it, Race it" an I've always wanted to be a professional scorpion racer!
- It was free!

We'll that lasted about 5 minutes before she looked at me like I was a complete loon.
The pieces are small.
Really small.
The instructions are tiny and hard to read.
Not just because I am an old man who has to hold things farther and farther away to read them (which by the way, I can't believe is actually happening to me!)
By using dark shaded CAD images, it is really freakin' hard to tell what is supposed to go where.
The pieces go together but the images are so dark and textured, they are not clear enough to always see exactly what is supposed to go where.
I say that as a guy who has built A LOT of models and assembled all sorts of fiddly little toys over the years. You have someone engineer these little toys to amazing precision but it would break the bank to print it on a large sheet of paper?
So having said that, they can be assembled and look good when done, but I found the walking action to be clever but disappointing.

So if you are trying to put one of these kits together, here are some photos that may help.
I missed a step or two here and there but you should get the idea if you are stuck on a step.
In the end, like I said, they go together well and look cool, but you can't be guaranteed they will walk properly, let alone "race."
(If you lost the original instructions, here is the link to them. Clicking on the pictures below will open up large images for you to view and that may more helpful for you anyway.)
Step 1 and 2
 | 
It will look like this assembled.
|
 |
Step 3 and 4
 |  |
 |
Step 5
 |  |
Step 6
 |  |
Step 7
 |  |
Step 8 and 9
  |  |
Step 10
 |  |
Step 11
 |  |
Step 12
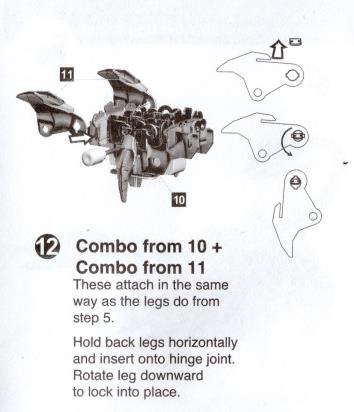 |
Put the legs from Step 11
on to the body assembly
from Step 10.
|
Step 13
 |  |
Step 14
 |  |
Step 15
  | 
Getting the tops on and the clips
on the legs
|
Step 16
 | 
Not the Crawl...THE CLAW!
|
Step 17
 | 
I think I skipped ahead to 18 on
this step since the back plates
are already in place.
|
Step 18
 |  attach in step 17 |
Step 19
 | 
Insert tail joke here
|
Step 20
 | 
Okay, there you go.
|
As a puzzle these are pretty cool and the design and engineering behind them are neat.
The legs really crawl and give it a bug like look but the motors seem inconsistent. The two I got in the kit do not wind for anywhere near the same number of turns.

.
The movement aspect of the toys is just sort of spazing out in place or maybe walking in a circle for a few seconds. At least with the two I built, no way could you ever race them.
Here they are "racing":
Here is probably the best to be expected:


0 comments:
Post a Comment