Showing posts with label Climbing Toys. Show all posts

Friday, June 21, 2013

Fixing a Climbing Monkey Toy


It looks a bit like The Island of Misfit Toys around here at times. Toy and parts of toys that just aren't quite right but I don't have the heart to dispose of are in boxes or on shelves all over the place.  A couple of years ago I wrote about a climbing monkey toy that I had made that was perfect except for two thing:


1) It was creepy.
2) It didn't work.

Other than that... PERFECTION!
 
I had fun making him and always though he should have worked so I didn't throw him away. I had gotten the plans for him from a book at the library I used to work at. I switched jobs and returned that and the other 6,743 library books I had checked out and moved on about 6 years ago.
 

About three months ago I found myself returning to the local library for of all things... books! (I know, who'da thunk it?) So on the shelf I see "Making Moving Toys: 30 Quick and Easy Projects to Make" by Pipa and Ian Howes.  I had forgotten the book's title but immediately recognized the cover. It was the book with the climbing monkey plans. (And a bunch of really fun toy ideas not all of which are made of wood. I highly recommend the book.)
 
So I revisited the monkey plans and was gobsmacked to see right there on page 55, that I had, dare I say it, strung my monkey up wrong. GASP. I didn't follow directions and that is why my monkey didn't work. I checked out the book and then spent the next few months in a fruitless search through the Tetris like collection of boxes in our computer room looking for the creepy monkey toy that didn't work. Such is the lot in life of a Toy Making Dad.
 
I eventually returned the book but copied page 55 just in case. Two nights ago, the just in case happened. I found my monkey. There was much rejoicing.
 
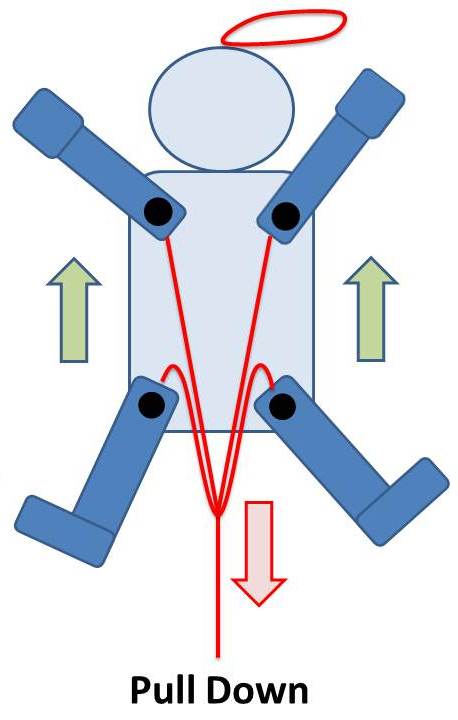
So I strung him up the way the book said and I could immediately tell the difference. The black elastic needs to be very tight around the nylon rope on the bar between his hands. It also needs to be strung tightly through the eyelet on the bar between his knees. This pulls his knees up to hands after the downward pull of the rope is released setting up the ratcheting action that allows him to climb the rope.
 
 
I noticed that the monkey's legs were sort of stiff and didn't pivot as smoothly as they should. There is an 1/8" dowel that works as an axle and my guess is that the original hole through the monkey's body wasn't wide enough to allow free motion. The dowel may also have expanded over the years. Time for the patient to go under the knife... or rather, drill press.
 
I used a 1/8" bit to drill out the dowel from either end. I took my time and once it was most of the way done, I used a little pick to scrape the rest out and free the legs. I then took a 5/32" bit and enlarged his hip socket so his legs would swing freely once I put a new piece of 1/8" dowel in there. Piece of cake. The operation was a success.
 
So now he works. He doesn't go flying up the rope like the other climbing toys, but it is pretty cool how it works. I think that adjustments to the tension of the elastic and the type of rope may improve his performance but for now, I can just settle back in the knowledge that Fritz the Creepy Monkey Who Couldn't Climb has moved off the island of misfit toys and can now "hang" with his friends in plain view.
 

Saturday, December 22, 2012

Emergency Jumping Jack Toy Repair


As a bureaucrat, most of the "Can you fix this?" requests I get involve columns of numbers, forgotten passwords and if I'm lucky, misfed media in the high capacity feeder (Oh, you want me to fix a paper jam? Why don't you just say so?)

Anyway, a couple of days ago a friend who works in my department told me the sad tale of a broken ballerina. She has two little daughters and the older girl has a "Jumping Jack" toy painted to look like a ballerina holding a tiny nutcracker. Well, little sister was playing a little rough and it resulted in a broken leg for the toy. (In my house it would also have resulted in threats of a broken leg to the younger sibling courtesy of the older one. Just saying.)

So the obvious question was "Can you fix her?"
Absolutely.
Everything wooden can be fixed.
That's part of why I love making wooden toys.

So, before I show the fix, let me explain the toy. Jumping Jacks are really simple toys that have been around for ages. According to "Easy to Make Old Fashioned Toys" they became popular in 18th century France and are often made from cardboard. (A pattern and instructions for making one out of card stock can be found in that book.)


In general, this is how they work:


The arms and legs have a have a hole in them and a peg or paper fastening clip goes through them and are anchored to the toy's body. Strings are tied to the tops of the limbs and then another string is tied to the center of both of those strings.

A loop of string allows the toy to be hung from a  hook, doorknob or finger.

To play with the toy, just pull down on the string. The arms and legs will go up and down as the string is pulled and released. Pretty simple, huh? It is fun to watch because as you pull down, the limbs go up.
The difference with the toy I worked on is that the ballerina had a printed plywood front and back so the connecting parts are hidden. Also, instead of one vertical string connected to the two horizontal strings, all four limbs have their own string that all meet outside of the toy in a bead. It allows for a wider variety of moves because the limbs don't always move in unison. Pull more to one side and the limbs on the opposite side move more. Hey, even better, right?

Okay - Enough history and theory. We have a patient to save!


I got the ballerina home and started to give her a look. (Blood pressure was 0/0 and stable... So far, so good.) The limbs pivot on tiny wood pegs that if I had to take a guess would say that they are less than 1/32" thick. (Bamboo maybe?) In the middle is a small block to help support the "sandwich" of the front and back. There was no way to remove the back of the toy without breaking all of the remaining pegs.


I decided that I didn't want to drill out the holes for a replacement peg because then the repair would be harder to hide. Besides, I didn't even have a drill bit that narrow handy. So I bent the end of a very stiff steel wire and started to dig out some of the broken peg. My thought was to use a different, more flexible piece of wire to squeeze in to replace the peg. I lucked out though when the remainder of the peg slipped right out without damaging the rest of the toy.


Then I cut a length of that stiff wire off to form the new peg. The rod was a perfect fit in terms of thickness. I test fitted it a couple of times with and without the leg. Once it was cut  to length, I super glued it in making sure that the leg still swung freely.


I cut the pink end off of the piece of peg that had come out. I intended to use it as a perfect plug. (Insipred by Crawfish's careful re-use of original parts.) Of course it was the size of a pinhead and I dropped it as soon as I went to plug the hole. *SIGH* No fear. A trimmed up piece if coffee stirrer wood and a little pink craft paint got the job done.


And that was that. It ended up being just a little fiddly but I really lucked out and it was a much easier repair than I thought it was going to be. Ballerina and owner have been reunited and all is right with the world. (Well, not really. But some kid is happy to get her toy back so that's good enough for me right now.)


It being close to Christmas and with most of my tools in storage pending the completion of our addition, it had actually been a pretty frustrating time for me. Usually I have a few toy in various states of assembly at this point and this year, nothing. This little project came along just in time.

Monday, February 15, 2010

Climbing Monkey - FAIL

"Haven't you always wanted a monkey?" - If I Had a Million Dollars (Bare Naked Ladies) 
"Sure, just not a creepy one that doesn't work." - Toy Making Dad.

So when I started posting things on this site, I decided that it wouldn't just be show and tell. I wanted it to be a how-to site ( as opposed to just  "Hey everybody, LOOK AT ME! LOOK AT ME! PAY ATTENTION TO ME!") I think that a big part of learning how to do stuff is to learn how NOT to do stuff. You only figure this out by doing something wrong. Which isn't the worst thing in the world, and honestly sometimes these "mistakes" lead to new techniques or better ideas.

Building the creepy climbing monkey was not one of those times.

The plans for this guy (complete with fez I might add) were in a book I got from the library six or seven years ago. I don't blame the book but in retrospect, I don't remember building anything else from that book. Mainly because nothing really caught my eye as being super cool except for the idea of a climbing monkey. I believe the book said that this was based on antique German tin toys that worked the same way.

My dad and my younger brother always had a "monkey thing" (that is until the spate of monkey mauling stories over the last couple of years) so that was added motivation for building this toy.

The basic idea is you pull the string down and the monkey pulls himself (or herself) up the rope for a few inches. You then relax the tension on the rope; his legs swing back up and grab the slack. Then you pull down again and he climbs by pulling himself up. Sounds good, it should work...

Monkey legs move up when string is at rest because  of a little bit of elastic.Pulling down on the string should make him seem to pull himself up the rope.

Maybe I was being an idiot but he just never worked right.  I never got the tension correct on the elastic that pulled his legs back up. I'm also not sure that I ever got his string "rigged" properly. He would climb, but it was so small as to be almost imperceptible. Pulling the string eight or ten times would result in a climb of 1/4 or 1/2 inch. Not the kind of fun the kiddies are looking for. So in a word - FAIL.

Well, maybe I did learn a few things from this build: 
  • Leaps of faith are one thing, but if you really don't understand how something is going to work... you need to build a proof of concept piece first.
  • At the time I felt I had to do the complete build before testing because I wasn't going to be able to paint and finish the toy once it was done. I was wrong. You can always partially disassemble or just tack things on lightly to test.
  • Although I love his creepiness now, I probably should have just started over with the face...
 

The book was returned long ago to the library. I don't remember the title and I've never gone back to try and research similar toys to see how the strings should be rigged. I still have the little guy around though.

When I showed him to my younger brother, he laughed and said that he looked too evil to be a kids toy. He has kids now. Maybe I will look up how to fix the monkey... so I can give him to his kids and scare them. Hey, it's what older brothers with evil monkeys do.

Sunday, February 7, 2010

Climbing Toy

This climbing toy is one of those folk toys that is so crazy easy to make and use that it is almost scary. (Not Night of the Living Dead scary, just scary good.) Just pulling strings up and down makes these simple toys seem to magically climb straight up. You can easily knock one of these out in less than a hour.


The first one of these I built was from the "Climbing Bear" plans in John R. Nelson's "American Folk Toys." (Again, it is a great book, you should pick up a copy.) I painted mine and when I look at him now he seems so much rougher and less "finished" than most of the toys I make now. But you know what? WHO CARES! He is a happy bear who has been played with a lot and has a lot of years ahead of him. "A good toy now is better than a perfect toy never."


It is a simple build. There are only two parts and some string. (I've included a pattern and plans at the end of the post.)
  • Transfer your pattern to the wood you are using (The plans called for 3/4" wood but all of mine were made from 1/2" pine because that is what I had on hand at the time.)
  • Cut out the pattern using a coping, scroll or bandsaw with a small blade.
  • Drill two 1/8" holes horizontally through the arm/hands of the toy. If you were to draw a straight line across the toy where the holes exit from each arm the holes would slope back towards the head at about 45 degrees. (No fissionable material is used in the making of this toy so if you don't get it exactly right, relax. Trust me. It won't explode no matter how off you are.)
  • Make a toggle bar a little wider than your toy. I used a 1/4" thick by 1/2" wide by 3 1/2" long piece of hardwood. (A 1/2" round hardwood dowel could also be used.)
  • Drill three 1/8" holes in the toggle bar. One in the middle (this is what you will hang the toy from) and a hole on each side 1 1/4" from the center.
  • Use nylon string to make the two climbing ropes. Thread them through the toggle bar and then through the holes in the arms of the toy. One string on the right, one on the left. Tie the strings off in large knots or through wood beads. The string can be any length you want, just keep in mind where you will typically hang this toy.
  • Make a loop out of the nylon sting and have it so that it is above the toggle bar. Secure it through the center hole with a large knot or bead.
  • Find someplace to hang your toy and then alternate pulling the strings up and down. (Sort of like you were milking a cow.) The toy will climb right up.

A completed toggle bar

About a year or so after I made the bear, one of my daughters asked me to make her a climbing gingerbread man for Christmas. It seemed like a really sweet idea so I made that for her and an angel for her sister. That way they could race between the two toys to see whose could climb the fastest. Here is how they came out and below are two quick clips of them in action and plans for the Gingerbread man.
The buttons on the Gingerbread Man
were made with axle caps.
The wings on the Angel were made
with, what else, clementine box wood.


Here is my first shot at plans.
They should print full size on an 8.5 x 11 sheet of paper set to landscape.
For the eyebrows and mouth I used thick "puff paint" to give it an icing look.
If you don't want to use this pattern, you can trace a cookie cutter or use some teacher clip art.

Just Saying...

While we don’t necessarily need more objects, we just might benefit from more making.
- John Dunnigan

Followers

About Me

My Photo
Regular guy who likes to make stuff who lives with a very patient wife, three daughters and three cats.