Showing posts with label Cannons. Show all posts

Monday, April 19, 2010

Making a Toy Cannon (Part 2)

Part 1|Part 2
I've only ever had a few life changing purchases in my life (eg my first car, my wife's engagement ring, that jar of boysenberry jam a few weeks ago...) but my drill press is definitely one of them. The question isn't "What can you do with a drill press?" The question is "What can't you do will a drill press?" (So far, flossing and baking a cake are the only things I've failed at with it.) It has opened up all sorts of toy opportunities for me.
First rule of the drill press - don't be an idiot. Keep that in mind and no one will get hurt. Keep your hands away from the spinning and cutting parts and CLAMP EVERYTHING you are drilling. The bits can create a tremendous amount of torque; don't kid yourself into thinking you can hold something in place while you are drilling it. If you can't clamp it directly, take a minute and make a jig. It is well worth the effort.
Since our cannon has a solid body, we have to bore out the barrel to make it:
  1. Look cooler and
  2. Actually be able to shoot stuff!
Since the barrel has such an odd diameter, we can't just use a spade bit to drill a hole to place it and then lock it in place with a dowel. Instead I lined up two pieces of scrap and drilled a 3/16" hole through both of them. When the boards are upright, the barrel can be locked in place by a dowel straight through one board, through the side of barrel (the trunnion holes) and out the other board. This will keep it locked in place while you drill away.


Here are the measurements that determined what size holes I drilled.
  • The total length of the barrel is 3 7/8"
  • The barrel at its most narrow point is 1/2" in diameter so I went with a 3/8" bit for the bore.
  • The depth of the 3/8" bore hole is 2 1/4"
  • The plunger hole is 5/32"


With the jig firmly clamped to the work surface and the two pieces of the jig clamped to each other around the barrel we are ready to drill.


I drilled the bore first and then I just unclamped the jig and spun the barrel 180 degrees around the trunnion dowel and made sure I was lined up for the plunger hole before I clamped everything again. I replaced the 3/16" dowel as well since the bore passed through it. Hold on to the dowel pieces though, we have use for them in a few paragraphs.


The hole through the breech end of the barrel needs to be big enough that a 1/8" dowel will pass smoothly though it, but not so large that the spring that will live inside the bore could slip into it at all. I drilled a 5/32" hole through the breech until it was all the way through to the bore.


The last bit of drilling is to make a 1/8" hole in the center of a 1/4" dowel. This will be the plug on your plunger and it will live inside the bore. Again, a simple jig is in order. Just drill a 1/4 hole in a board and put a piece of dowel in it. Line it up, clamp it and drill a small hole.


Use epoxy or your favorite polyurethane glue to attach a piece of 1/8" dowel into the hole you drilled in the dowel plug. Make sure you have a good fit. I even lightly scored the 1/8" dowel to give a little more surface area for the glue to adhere to. Let it dry for the full curing time. You want this to be as solid as possible. After it dries, smooth and round off the top of the plug and test fit your pen spring. You might want to flair out the breech end of the spring to be sure it will stay clear of getting in the hole intended for the plunger.


Use a round file (which my dad always called a rat-tail file) to smooth out and slightly enlarge the bore. Take those scrap pieces of 3/16" and glue them into the holes of the side of the cannon. It's fine if they are too big right now because you can trim them to length later. After they have dried though, you'll want to use the file to be sure no glue or pieces of these dowels intrude into the barrel. For the cannon to work its best, you need a smooth bore.


Okay, you are in the home stretch now. With the spring in place, slide the plunger down the bore and out the breech hole. Pull the dowel back and forth a few times to be sure the plunger operates smoothly and the spring is not catching on anything it shouldn't. File and sand as needed. When you are happy with everything, place the bead you are using for the (ooooh, more cannon vocabulary!) cascabel (also known as the round thingie at the end of the cannon) on to the dowel. Pull the dowel back just to when you start to feel that the spring is engaged, and then mark the dowel where the back end of the bead is leaving about a 1/8 - 3/16" gap between the front of the bead and the back of the cannon. Cut the dowel where you marked it and then epoxy or polyurethane glue the bead to the dowel. Let it set up completely before you test it out and make sure that while it dries, it isn't gluing itself to back of your cannon.


Here is the cannon "at rest."
The dowel goes completely through the bead.
(Note the gap between the bead and breech)
Here is the plunger pulled back to its maximum.
It doesn't take much to fling a little ball.


Time to take it out to the test range. I used 1/4" beads and small piece of 1/4 dowel shaped to look like an artillery shell. The range on this test make it seem like this really zings the projectiles, and it sort of does, but that target was really close. When I tested these for distance both types flew a little over 9' 6".


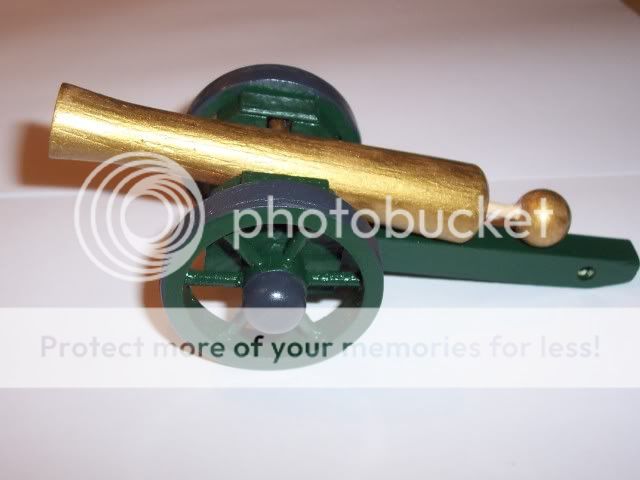
Since everything worked I finished up the kit pretty much as advertised except that I added spoked wheels that I made and put some clementine box wood over the trunnions to allow the barrel to pivot but still stay attached to the carriage. I painted the cannon, carriage and wheels with acrylic craft paint and finished it with polyurethane.

Although I used a $1 kit for this, any piece of dowel more that 1/2" thick could be used following the same plans. The projectiles are really light, but also very small, so don't make this for really little kids. Make sure that whoever plays with it knows you could hurt someone's eye with it and never to point it at anyone. I think that the scale is a little big for 1/32nd soldiers, but not so huge that it looks out of place and couldn't be used.


The finished cannon in all its glory.Remember -
Treat every cannon as if it was loaded.
Making a Toy Cannon
Part 1|Part 2

Thursday, April 1, 2010

Making a Toy Cannon (Part 1)

Part 1|Part 2

The toy soldiers of my youth were mostly the 1/72 scale tiny Airfix figures, but my family and friends also had a fair amount of 1/32 scale "Cowboys and Indians", some Vikings and the ever popular "Little Green Army Men." One Christmas I got a playset that had a cannon that used a pull back plunger to launch little shells across the rec room floor. Cool stuff. Even after the wheels broke, I continued to play with that cannon.


A few years ago I made this "pirate cannon" as a proof of concept toy. ("Proof of concept" is my way of say that I was just messing around with an idea so please don't look too closely at the quality.)


It has a 1/2" bore down the center of a 7/8" inch dowel. I have to tell you, I made this pre-drill press. It really helps if you have a drill guide... and a lot of extra dowels.


It can shoot a 3/8 wooden ball most of the way across our living room and continues to serve us well.


A few months ago I saw this kit for a dollar(!) at a local craft store. ZOINKS! A cheap wooden cannon for a buck. (Please take a moment to reflect on what a great country we live in... and the vast amount of wood and inexpensive labor available in China.) I snatched a couple up and got to work on turning them into something a little more realistic looking while still being a toy.


The kits come with "everything you need" (glue, pant, sandpaper, paint brush.) I put all those in the "I'll find a use for them someday" bin. The wood parts are good enough. I mean, what do you expect for a dollar? (Besides a new suit.) The carriage I pretty much used "as is" but the other two components were where some changes needed to be made. The wheels just don't cut it. Besides the axle holes not really being centered; they make the kit look a bit like something out of the Flintstones. Anyway, I'd already come up spoked wheels for just such a project.


The barrel isn't huge but it has a decent shape. At the mid-point is a 3/16" hole that holds a dowel to provide a pivot point for elevating the barrel (in case you are ever on Jeopardy, the technical term is the "trunnion" ) The barrel is just big enough that I can make a spring powered plunger that will allow it to actually shoot 1/4 balls and dowels pieces. The muzzle has a shallow hole and so does the breech. All I have to do is bore them to the correct diameter and depth.


The barrel that came with the kit is 3 7/8" long. It is tapered through the length of the barrel and is 1/2" at its narrowest and 13/16" at its widest. (I know, 13/16" ????? But hey, just keep telling yourself... I only paid a buck....)

Before we get drilling, let me show you what we are trying to do:

Next time - Drill press adventures.


Making a Toy Cannon
Part 1|Part 2

Sunday, January 17, 2010

Making a Spoked Wheel (Part 3)

Part 1|Part 2|Part 3

I've made the hubs of my spoked wheels using a jig with a peg on a board that allows me to cut a circle using a bandsaw with a thin blade. If you are careful (which you always have to be) it is a pretty fast and easy way to make tiny "doughnuts" (mmmmm doughnuts....) However, I have to admit, it is really easy to allow your fingers to get too close to the blade, and that is a really bad idea.


I've recently found that you can buy 3/4" or even better yet 5/8" hole saws and just cut hubs using them. Use a pilot bit the same size as the hole on your previous disk and you can cut use that piece of waste. The disk will still have the radial holes drilled in it, so just use the same sort of jig with the 1/8 dowels to keep it in place. 
Okay, time for the spokes so one more jig. All you need is a thin disk cut with your 2" hole saw and a dowel the size of your axel hole (in this case 1/4".)
  • Glue the disk to the dowel (or is it the dowel to the disk?) and make sure the disk and dowel are perpendicular while they dry.
  • After your jig dries, clamp the rim to the disk and place the hub over the dowel and push it flush with the disk.
  • Push 1/8" dowels through the radial holes of the rim and glue the ends to the hub. (You may need to sand the dowels slightly or run a 1/8" drill bit through the holes quickly to widen them a bit or make the hole more "true.")


The jig guarantees that the axel hole of the hub will be at the center of the wheel.
A snug fit is good because the spokes are glued to the hub and not in the holes of the rim. You can go back and put some glue on the spokes on the inside of the rim if you want.


After the spokes dry, remove the wheel from the jig and cut off the excess dowels.

Sand the wheel and take a moment to revel in the fact that you have stuck it to the man and made your own spoked wheel rather than just buying one.


If your pirate ship should happen to need a new helm, you can always stop a this point.
The finished wheel next to a "pirate" cannon. In the same way that spoked wheel aren't right for the pirate cannon, solid wheels wouldn't be a good match for a field artillery piece.

So there you go. It took far longer to record and photograph the process than it did to make the wheel. Just a couple more words:

Remember, you're building little toy wheels, not components for the Space Shuttle. Don't expect perfection.


I probably should have mentioned to make at least two wheels at a time. (Wheels tend to be needed in even numbers for some reason.)

The bronze and green cannon shown in the first post on this topic was a heavily modified $1 craft store kit that will have its own post one day. This latest wheel is destined for a future toy of this local landmark:


Making a Spoked Wheel
Part 1|Part 2|Part 3

Saturday, January 9, 2010

Making a Spoked Wheel (Part 2)

Part 1|Part 2|Part 3

So, now you have the disk with spoke lines drawn on it. What you want to do next is drill radial 1/8 holes along the side of the disk towards the center.

Sounds complicated, but it really isn't. Piece of cake actually (mmmm cake...) You just need to make a simple jig.
  1. Drill a 1/4 " hole (or one the same diameter as your axle hole) in a board that is wider than your disk.
  2. Put a piece of the correct size dowel in the hole, pop your disk on to the dowel and then turn the board on its side so that your disk will be parallel to your drill bit.
  3. Secure your new jig to your workbench or drill press. You want your drill bit to be centered on the thickness of your disk and be directly in line with the center of your dowel (which will be used as a pivot for your disk.)
Honestly, it took more time to type that than it will for anyone to make it. You'll end up with something that looks like this:


The drill bit needs to be centered on the pivot dowel.
The bit needs to centered on the thickness of the disk as well.

Now the easy part. Using a 1/8" drill bit, line up one of your spoke marks and drill your first hole into the disk. You want to be sure that it will be at least as deep as you want your rim to be wide. Also not so deep that you'll leave holes in the hub of your wheel if you use the inside of this disk to make the hub. For this example, I drilled between 1/4 and 1/2" deep.

After you drill your first hole, simply rotate your disk until you line up your next spoke line. Drill that hole and repeat rotating and drilling until you have all six holes drilled.


Okay, entering the homestretch. Your next jig is simple as well. This is what going to allow you to cut out the rim with a minimum of hassle.
  1. Use your hole saw to cut a hole in a board the same thickness as your blank disk. (This gives you another wheel blank as well.)
  2. Trim the board up so that you have about 1/2" on the top and bottom of the hole but enough wood left and right of the hole so that you will have plenty of clamping space.
  3. Draw a line directly though the center of the hole and then turn you jig on its side.
  4. Drill a hole just slightly larger than 1/8 (3/16, 5/32 etc depending on what you have on hand) on the top of your jig, lined up with the center line you drew and all the way through the 1/2" margin of wood. Repeat this for the bottom.
  5. Place the disk with the drilled spoke holes into your jig and then use 1/8" dowels through the top and bottom to secure it to your jig. (Because the holes in the jig are just a little bigger it will be easy to move the dowels in and out of the jig but they will seat firmly into the disk.)
  6. Put your smaller diameter hole saw (for me 1 1/2")  into your drill. Line up your jig so that the pilot bit on your hole saw lines up directly with the hole in the center of your disk and clamp it securely. (The hole is slightly larger than your disk so you have the ability to adjust it slightly up and down to line up correctly.)
  7. After you are lined up, drill half way through disk. flip the jig over, line it up and secure it again and then finish your cut.
The cutting of your rim will look like this:


Lined up for your first cut. Keep your hands away from holding anything near the hole saw. The dowels keep the blank from spinning in place.
Flip it, line it up, secure it and finsh the cut. Let the blade cool before touching it.


What you end up with. The perspective is a little off on this photo but the rim is actually 3/16ths all the way around.


Making a Spoked Wheel
Part 1|Part 2|Part 3

Sunday, January 3, 2010

Making a Spoked Wheel (Part 1)

Part 1|Part 2|Part 3

I know, I know, you can buy wood toy wheels pretty cheaply. Nothing wrong with that. I use pre-made wheels all the time because they look good and get the job done. However, sometimes, they simply don't have the look I need for a particular toy. Case in point - the Spoked Wheel.

You can buy spoked wheels like this online or in just about any craft store for anywhere between $.50 and $2.00 apiece. (Wait a minute.. $2.00 apiece??!!!! That's crazy talk! Why, a man should be able to buy a new suit for $1.50... $1.75 if they throw in a tie.) They look fine if you are making a MG or Model T but I have something else in mind.


Namely, a toy cannon. (Got a problem with kids playing with artillery? Hey your choice. Use the spoked wheels to make a wagon. But, you might want to avoid this site in the future because there are toy tanks and yikes, a toy bombsight in the queue. Besides, what happens when the wagon gets attacked by dinosaurs? You'll probably need the cannon at that point.)


My spoked wheels have all been made from wine crate wood. (Don't judge me. I just... um.. happened to find this wood at a beer/wine store.) 3/8" has been the right thickness for the scale I'm shooting for and it has been easy to work with. So far, no broken wheels. If you have a bunch of Brazilian Mahogany laying around to make toys with ...well, have someone on your household staff follow these direction to make your wheels.


If you wanna make wheels, you really need to get a couple of hole saws. They are inexpensive (I got these at a Black and Decker outlet store for about $1 each) and can be used a lot in toymaking. The two sizes I'm using here are 2" (which results in a 1 7/8" disk) and 1 1/2" (which gives you a 1 3/8" disk.) As a bonus these have interchangeable pilot drill bits in them which lets you pick the size of you axle hole. (If I had a nickel for everytime I've been called an axle hole...)  So here is what I did:
  1. Make sure there is waste wood under your wheel wood and securely clamp your board to your work bench or better yet, drill press. Be sure it doesn't move at all. The hole saws really generate a lot of torque. Be absolutely sure your hands are not anywhere near the saw blade or could slip into or near them if your board does slip.
  2. Use the 2" saw to drill almost all the way through the board. 
  3. Now flip your board over. Secure it again. Line up you pilot bit and finish the cut.
  4. Because you didn't cut all the way through, you will get a much smoother disk and it will be easier to remove from the saw.  Trust me on this one, let it cool before you grab the disk.The saw can get pretty hot especially if you are working with hardwoods. .
  5. Now, put your middle school geometry to work. Break out the protractor and draw your spoke lines. (For six spokes that is one every 60 degrees.)

The hole saws can be seen in the bottom right of the photo along with my high precision $.10 green plastic protractor. What can I say? The right tool for the right job.


Making a Spoked Wheel
Part 1|Part 2|Part 3

Just Saying...

While we don’t necessarily need more objects, we just might benefit from more making.
- John Dunnigan

Followers

About Me

My Photo
Regular guy who likes to make stuff who lives with a very patient wife, three daughters and three cats.