Whirligigs are something that have always interested me. They have that great folk art vibe and are almost always "whimsical" in nature. I have a couple of books of plans but haven't managed to build one on my own yet.
Well, that's not entirely true. I haven't managed to successfully build one yet. I worked on a penguin a couple of years ago and carved a couple of surprisingly elegant flipper/wings for the little guy that simply refused to work. After a year on the shelf, he was sentenced to the burn box out of frustration.
A few months ago a friend asked me if I would be willing to try and fix "Dee Daw" for her mother in law. Dee Daw is the name for their wooden goose whirligig. Apparently Dee Daw had a long, much beloved history with this family but he (she?) was on his last legs (wings?) I said I couldn't guarantee success since I had failed at my last attempt at a whirligig but I was willing to give it a shot. Dee Daw came home with me a few nights later and waited patiently in my shop for his turn.
So fast forward to a couple of weeks ago and I found myself lacking in pressing home and family projects and completely absent any excuses for making sawdust. So it was time to unpack Dee Daw and see what the deal was.
In short... both wings were broken and at least one piece was missing. He was also missing an eye and his finish was very rough and flat. Dee Daw had clearly seen better days.
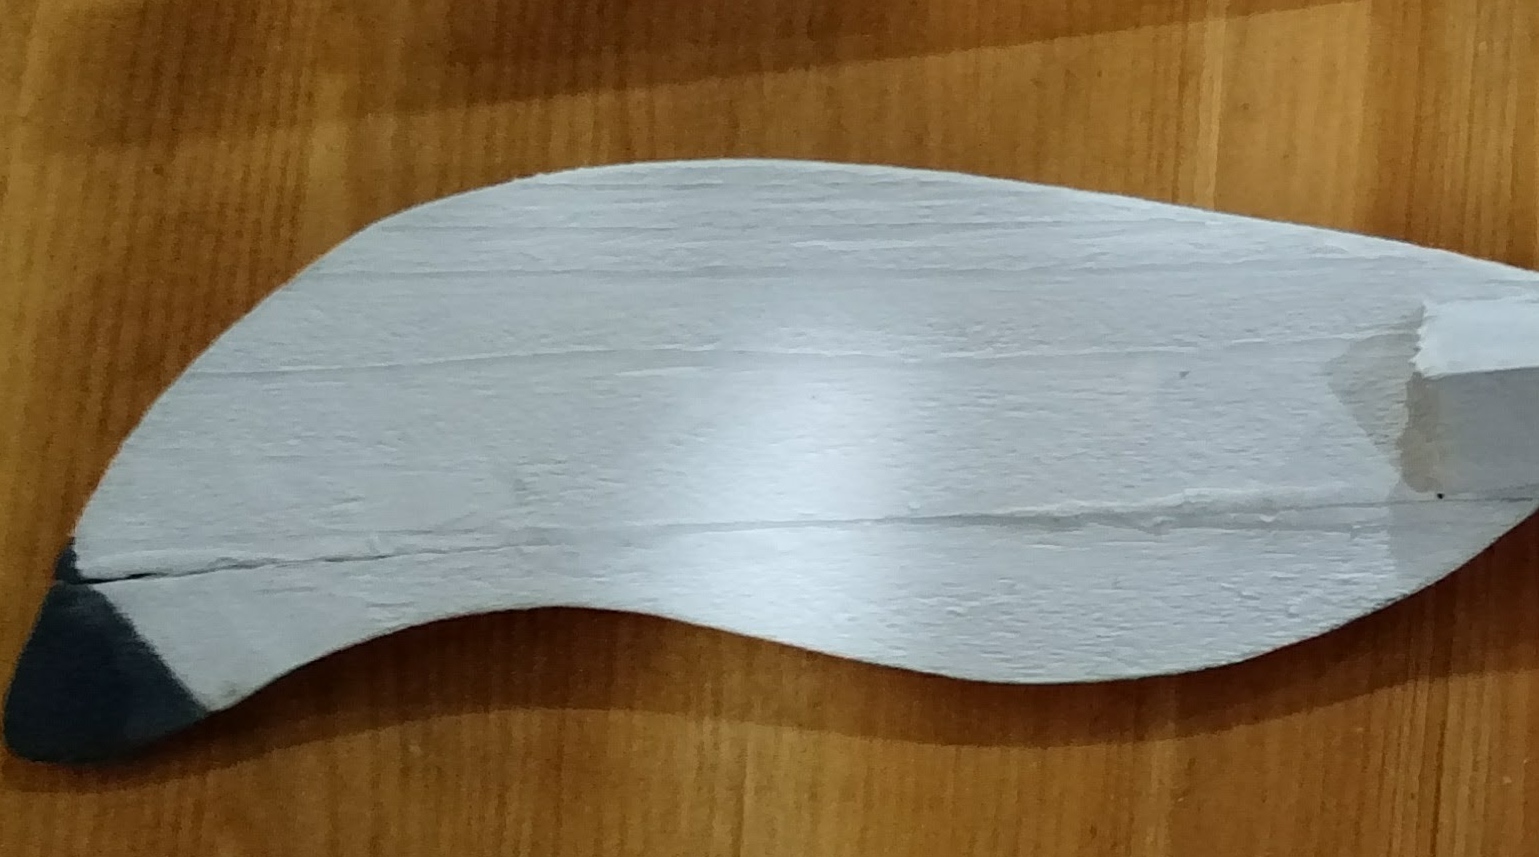
It looked like either his wings had been repaired before or that had been made from glued up boards and were not solid pieces. In either case, I decided that they couldn't be fixed and needed to be replaced.
Each wing is made of three pieces. Two flat blades and a central wood block. I took the wing that was detached from the wooden block and used it to trace a template. I allowed for the piece that had broken off inside the block.
I used 1/4" thick solid boards from the bottom of a wine crate for his new wings. I couldn't see 1/4" plywood holding up to the weather but... what do I know? Anyway I cut the wings out in pairs on the band saw to save time and to help ensure balance on the wings by using pieces from the same board for each pair of wings. (Each wing shown here actually has two layers for a total of four blades.)
The original central block on Dee Daw was 1" square and 3 1/4" long. There is a diagonal cut 1/4" wide and 1" deep on each end that are angled opposite each other. There is a hole through the middle and there is a #10 2 1/2" wood screw with #10 stainless steel washers on either end. It is really a bit of genius design here in that the screw has a smooth shank that allows the wing to freely pivot around the screw with a minimum of resistance. Although this is in direct contrast to that fundamental principle of web design - "Why make it simple, when we can make it complex?"
At this point I noticed that the diagonal cuts on these wooden blocks weren't...GASP..perfect! ASTONISHMENT!
You mean to tell me that folk art whirligigs don't need to be engineered to within 1/1000th of an inch and perfectly balanced?
Well, apparently not. Clearly the more precise you are the better but close enough appears to be... well.. close enough.
So with my new found frame of reference and my recently created outdoor workshop, I realized I can experiment. Every moment spent on a project doesn't have to show in the final product. If it works, great. If it doesn't, well I learned something and there is always the fire pit to destroy the evidence. (That's why everyone has fire pits now. Way more cost effective to destroy your own evidence.) I took a piece 3/4" thick wood and cut and ripped it to be 3/4" square and 3 1/4" long. Not the exact dimensions of the original but now I realized it didn't have to be.
I had a jig made out of the 45 degree angle blocks from what else... clementine boxes! I marked off the areas to cut and the correct depth.
I just held the block in the right angle formed by the "v" of the two clementine box corners glued to a plywood base. (You could also use a dovetail or fret saw and a vice to achieve the same thing.)
The width of the cut was 1/4" to match the wings. I made several passes with the saw to nibble away at the pieces and then used a file to clean up cut and get a flat bottom. I then drilled the holes through the centers to fit the shinny new #10 wood screws.
I should also note that I made cryptic little scribbles on the blocks to keep then aligned to match what was originally on Dee Daw. This block has "RI" written on it to mean "Right Interior." The angles on the wings and their relative position to the other wing are what leads to the contra-rotating motion of the wings. Later when I painted the assembled wings, I pressed in a L and a R on the interior sides of these pieces with a small screwdriver. That way the marks showed after paint covered my pencil marks.
I sanded the wing blades to make them smooth but also to get the thickness correct. I mainly used my stationary belt sander for the thickness part but earlier on I used a palm sander. A few years ago I picked up a 60' long blue roll of "non-slip shelf liner" from a dollar store (just saying.. it actually only cost $1) Works great for me. It is soft and the dust falls into the mesh and is easy to clean. Wood doesn't shift around while I'm sanding. I should buy more...and just cover every surface in my house with the stuff. I see no downside.
I was careful to "sneak up" on a good fit and then used an exterior wood glue to secure the wings.
After letting the glue dry overnight, I put the wings back on and took him out for a test spin.
The wings started spinning almost right away in a moderate breeze. I was super happy. Now it was time to repaint and finish him.
The wings were straight forward. I used craft store acrylics and got great coverage.
Hey... do I not own the greatest coffee mug in this or any universe? Handmade by the amazingly talented and super nice folks at Claymonster Pottery. I smile a lot in general, but especially when I drink from that mug.
Now... back to our post.
When I first took a look at him, I couldn't tell if he had a finish that had worn off or if was just a flat finish that was showing some age. The other possibility is that he was intentionally finished this way to give him a more folksy look. Whatever the case, the owner asked me to give Dee Daw a fresh shinny new paint job.
I used some filler on the more obvious cracks and sanded everything before I painted him. Most of my paints are flats (I find it hides hides brush strokes well) and then I add a shinny finishing coat. This time the grey (or was it gray?) paint was only available in "Multi Surface" and it goes on a little thick and tends to be a little shiny on its own. No worries though. Once dry I covered him with brush on Rust-oleum Ultra Cover Clear Gloss. I usually use a rattle can of acrylic but I felt like he needed a more substantial coat to stand up to the elements (This is my first outdoor toy. Never thought about toys standing up to the elements.) Note - It works great, but it does run if your aren't careful... and maybe even if you are.
Last thing was to glue on nice new shinny eyes and take him out for a test flight.
He works great. My friend and Dee Daw's owner were both super happy with how he turned out.
I learned a lot, it was fun to work on and I can't wait to give making one from scratch a try.
For the visual learners - Here is a short video of some of the repair steps and Dee Daw's test spins.
I managed to go the whole post without a history of whirligigs or mention of the word's derivation.
However, I can't legally complete this post without noting the technical assistance Dr Teddy provided. While not a fan of birds... ESPECIALLY BIRDS ON HIS LAWN... he is a professional and takes his job very seriously.
When the patient was being worked on...Teddy provided the Cat-Scan.
Later while he napped he had the intern he is mentoring keep watch.
She also helped me test gravity in our dining room by pushing various parts off the table.
He is mentoring her well.
A Push Puppet.
You know, "The dog/cat/giraffe toy that falls apart when you push the button on the bottom toy and then springs back like magic."
Ohhh... THAT push puppet!
And no, I didn't know they had a real name until I started this project.
A few weeks ago a friend asked me to repair her dog push puppet. It had broken awhile ago but she managed to keep hold of all the pieces except for a small bone that the dog used to carry in his (her?) mouth. I was excited to give it a shot. I had played with a few of these over the years, but never actually had one myself.
Unfortunately the memory card where all the repair photos were on became damaged before I could download the photos. So all I have are post procedure pictures and a couple diagrams to share.
Cucciolo
But first - I have to use that BA in History at least once a year.
These toys have been around since 1932 when Walther Kourt Walss invented them in Switzerland.
Taking the first letters from his name he came up with WAKOUWA. That is the name they are still referred to as in some places and with collectors. The Kohner Brothers started making them in the US in the 1947 and they were a huge success. Later, imports from Italy and Germany began coming to the US. Until the '60s they were almost always made of wood but sometimes had a metal or plastic base. (Even now when I see them imported from China, they are often made of wood and not plastic.) By the late '60s though, most of these toys were being made with plastic and often featured licensed characters.
Alright, history lesson is over. Quiz on Tuesday.
This is basically how push puppets work and how I think they are assembled:
The base is hollow. There is a disk, connected to a spring, that has four strings attached. The strings pass through small holes in the base and up through the leg segments and body of the toy.
By applying some, but not full pressure to the disk, the strings can be tied off or glued into their final spots and trimmed up. With this toy, there are two holes in his neck for the strings through his front legs and two strings attached at the base of his tail for his rear legs.
Once the strings are secure, the clamp can be removed and then the toy will stand rigid since the spring is pushing down, keeping the strings taut.
To play with the toy, press the button "up" and the tension on the strings will lessen and the toy will partially or completely collapse. By not pressing right in the center, the toy can be made to dance or wiggle from side to side.
The little dog that my friend sent is all wood except for his fabric floppy ears and of course the metal spring and a plastic/vinyl cap on the push button in his base. He had no marking on him but he looks EXACTLY like some Italian push puppets from the 1960s that I have seen online.
I decided to not completely restring him and just added some very strong but still soft nylon upholstery thread to the existing string and make the repair that way. Besides not being 100% that I could get him properly reassembled, I also felt like the more I could leave it original, the better.
As described above, I used a C-clamp to keep some pressure on the disk and then I used a "Fisherman's Knot" to extend his broken string with this new thread. It work great and seemed plenty tight but I went ahead and put a few drops of "super" glue to the knot as insurance.
The neck of the dog is a separate segment. Both of the stings from the front legs go through the body and up through the neck and are tied off. I tied the new string to the old one, trimmed off the excess and put a drop of super glue on it for good measure.
The dog's head wasn't actually attached to the neck as far as I could tell except by pressure. I didn't want to glue it since I figured it could hinder future repair efforts. However after about the third time his head popped off when I was testing him, I decided to use just a little hot glue. I figured that it doesn't soak into the wood and would probably still be easy to get off if needed. You can see a little "string" of hot glue in this picture this I just hadn't cleaned off. Wow... digital cameras don't miss much. This is also a decent shot to show how the threads are strung through the toy.
And just for anyone who has to fix the OTHER end of a toy like this, this is how his tail is attached. The strings must be glued into the holes in the tail. I just don't see any other way to secure them there.
Last thing was to make and paint the bone. The hole in his mouth was just a little over 1/8" round so I know that would be the size of the dowel for the shank on the bone. In my bins of assorted but not always sorted parts, I had some 5/16" beads that have a 3/32" hole in them. I don't have a vice for my drill press and no way was I going to hold something that small in my hand while I tried to drill it so I kicked it old school. Behold... my grandfather's "egg beater" hand drill with 1/8" bit. I used the vice on the end of my workbench to hold the bead and the drill worked like a charm. No effort and a clean cut. What can I say, right tool for the right job.
The bone was finished with white craft store paint and then given a coat of gloss acrylic. After it dried, I assembled it in his mouth, glued the ends to the shank and touched up a couple of spots. All set.
Here is a video of the repaired toy:
These toys have a lot of character. They seem to come alive with just the slightest bit of pressure on their base. It was a fun project to work on. I got to learn a few things and most importantly my friend got her toy back and working.
It got me thinking about how this sort of toy's action could be applied to an automata toy. Hmmmmm.... stay tuned.
In clearing off the digital camera I noticed some of my weirder projects from the last year or so and I just wanted to share some of the oddness. It is only semi-toy related but as I accelerate my journey from eclectic tinkerer through to eccentric old man, I feel it may be worth a post.
In short - as an allegedly semi-handy guy who makes some weird stuff, I for some reason get asked to make a lot of weird stuff for people. Funny how that works out.
These are "Bronze Medals" for an Office Olympics I helped organize over the summer. The little plastic medallions had "Yo Gabba Gabba "stickers on them before I hit them with the metallic spray paint. (The medallions were in the discount bin at the Party Store which is odd since Yo Gabba Gabba is basically timeless. It will always be good advice to not bite your friends.)
Bottom of a clementine box as my spraying surface. Each medallion was sitting on a plastic soda cap. Oddly enough, this was the second time in eight years I had done this.
I gave myself a Silver Medal for the performance because I probably should have peeled the stickers off before painting them. Oh well, Gold in 2020!
This one is sorta bittersweet. I've made a couple of toy boats and want to make more but these weren't intended to float. They were for a funeral. (YIKES! Way to bring us down Toy Making Dad!)
A colleague at work asked if I could make centerpieces for the memorial service of the brother of a long time friend of hers. It took me about an hour and a half to make the prototype but maybe only 2 or 3 hours to make ten of them. I actually made templates and it was easy to see how things like jigs and design simplicity are key to "mass" production.
The bases were 1x4 pine with a small cabin cut from the same wood and shaped on the beltsander. Masts are oak dowels. The finish is beeswax and mineral oil.
He had been an avid sailor and the family placed a sail on each mast with details about his life and a quote printed on it. Guests seated at the tables got to bring the boats home as a keepsake. They were very well received. The colleague's friend ended up paying me twice what I asked for making them. Toys make people happy even in sad times.
One other weird bit about "mass" producing these boats...
My eyes see this:
But my History degree sees this:
Okay, and now about the gnome. The Risk Management Team in my office was putting on a "Safety Month" for our organization and they wanted a mascot. I have NO idea how the idea started but someone suggested a garden gnome with a traffic cone on his head.
Seriously.
So my buddy Bill hands me a gnome and a little plastic traffic cone and says "Hey, toy-man. Can you cut off his hat and glue the cone on?"
Well, the short answer is "Yes" but as a wise freshwater crustacean once told me, "Why make it simple when you can make it complex?" Besides... I know I was told it was okay to cut his old hat off but I'd much prefer to fix things and not break perfectly fine things. (Also, not that I'm a gnome guy...but he seems alive and I don't want some weird woodlands curse coming down on me.)
So I cut a square of 1/2" MDF to be the base of the cone. I then took a hole saw that was pretty close to the diameter of the hat and got to drilling.
Once it was done, I then kept doing trial fits to see what still needed to be removed. I used a rotary tool to taper the hole and custom fit it to his head.
Success.
So I painted the base black with some gloss black latex paint and then proudly brought it back into the office to show we had achieved cone-headedness without destruction. Bill thought it looked great but the team felt that the hat HAD to be orange to be a "real" traffic cone.
Seriously.
So I picked up four different shades of orange from the craft store and settled on... well "Orange" and four or five coats later, viola! A non-broken gnome wearing a traffic cone for a hat.
I had Teddy perform a "Cat-Scan" to make sure it was safe before returning it to the Risk Management team.
I learned a few things with the last carousel I had built. I had done a few smart and few not so smart things. The best thing I had done was cut out multiple disks for future carousels when I had my jig set up. When I went to make the next one, all I had to do was reach on the shelf and half my cutting was already done. I had also swapped out the camel from the plans in John R. Nelson Jr's amazing "American Folk Toys" and had replaced him (her?) with a zebra. That was the transition to saying "Hey, I can put any sorts of critters on this that I want!"
I had made a series of rookie mistake in cutting out the giraffe and in how I glued the animals in place. I simply didn't allow for how the grain ran in the wood for the giraffe. Specifically in its legs. If the grain had run vertically the legs would have been much stronger, however it ran horizontally which made them far too brittle. I know... Woodworking 101, Day 1. Now, in fairness to me, that's the way the grain is shown on the plans and maybe that makes it less likely to have his snout break off but because I don't run a pole through the animals bodies to make it look like a Merry-Go-Round animal, it means the legs are pretty easy to snap along the grain. Which is exactly what happened... twice.
So I briefly discussed "putting him down" and replacing him with another animal since no way would a giraffe make it the wild with one, let alone two, broken legs. However, the owner's mom made it clear that the patient had to live. I try to keep my toys as close to 100% wood as I can so I went with very carefully drilling 1/8" holes through the legs and then inserting dowels to complete the surgery. It was touch and go there but the patient never said a word and the procedure was a success.
Now for the second mistake. Initially several of the animals had come off of the spinning base and I think it was because I had used spray acrylic on the base BEFORE I glued the animals in place. (As a certain Crawfish reminded me.. it is called wood glue for a reason.) Okay. So I left the surgical implants in a bit long so that they could become pegs to insert in the base. Then I made a little template out of some scrap clementine box wood and drilled 1/8" holes so I could line up the pegs with the holes.
I made sure that I wasn't going to drill too deeply into the base by using a flag/tag of masking tape that is just a little bit longer than the pegs.
Then I drilled one hole in the base and pegged it in place so that the next hole would be the correct distance. This worked surprisingly well... almost too well... if that was a possibility. Which it isn't.
Last step was to trim the pegs up a bit so they would fit in nice and smooth. I also scrapped the acrylic off where the feet and pegs will be glued down to be sure there would be good adhesion. All fixed and truly "better than ever."
Ultimately, this ended up improving the toy for me. On the next one I built, I pegged all the animals to the base using the same method and it was very easy and resulted in a stronger toy.
Necessity is the mother of invention but I guess failure is the father of improvement.