Thursday, June 17, 2010

Making a Toy WW1 Tank (Part 4)


So the last things to do are make the sponsons, assemble, paint and finish the toy. (And play with it before I have to give it away.) All in all, not so bad and not too many surprises ahead.


The sponsons on the sides are a defining feature of British WW1 tanks. I want them to move but still be sturdy. It would be nice to have the gun barrels move left and right as well as up and down, but at this scale they would have been a little fragile and probably a bit droopy. So a few doodles and a test cut or two later a pretty simple solution came up.


I took another piece of 2x3 and drilled a 3/4" hole through it with a spade bit. Then I took a 3/4" piece of dowel and set it down into a "V" made out of... you'll never guess... the little support corners from a clementine box! (Clementine boxes really are the onions of the frugal toy making world.) I drilled a 1/4" hole about half way through that dowel and then inserted a piece of 1/4" dowel into it. (Don't glue it into place yet though. If you do, you won't be able to make some of the cuts coming up.)


Drill all the way through and make sure you have a thick enough piece of scrap under it.Simple jig that makes it easy to hold any size dowel in place. The triangles are glued down.


I cut the large dowel down to about 1 5/16" with the 1/4" hole being in the middle. I didn't want too tight of a fit because I want the gun to rotate without binding. With the barrel dowel in place I checked the fit and marked the widest point in the arc of the barrel rotation and then made straight cuts with the bandsaw. I tested the fit and made sure the larger dowel could rotate freely but not be pulled out to the front. Then I trimmed the sponson to the rough width and length.


I rotated the barrel through 90 degrees and marked where I need to make the cuts.Here is the "rough cut" of the sponson along with the 1/8" plywood that will make the roof and floor.


I used clementine wood that had printing on it for the roof and floor. I just made the printing inward facing because often that paint will "bleed" through the acrylic craft paint I use to finish toys. (Note to self - look for non-toxic primer.) I have plenty of clear wood I could have used, but I wanted to leave a little proof on a hidden inside part of the tank that this had been built using food box wood. It might seem psycho, but I felt like it was a little "shout out" to Homer McNeil and his toys.


Use enough glue to get a solid seal all the way around. Use clamps and be sure not to get any glue on the dowel that holds the barrel. It needs to be able to rotate freely.Don't glue the barrel in until after the top and bottom have dried and you have finished shaping the sponson.

I used a combination of the bandsaw and belt sander to get the final shape I wanted. There was a wide range in the shapes of the sponsons on the British tanks depending on the model number and the number of guns it carried. The next one I build might have a smaller dowel and barrel towards the back to house a machine gun. Anyway, mine doesn't match an exact version, but it captures the general idea.


Obviously, you'll need to make two sponsons. Make sure that your cuts and sanding match up. 
Now you can glue the barrels in. 


Here we go, the home stretch. I painted it olive drab with the red and white recognition stripes at the front.
I glued and clamped the sponsons one at a time so that I could be sure to line them up how I wanted them.
I did change the location of the nylon clacker to the back of the tank and held it in with a small brass screw. It sounds better clacking "in" rather than out on the gear and it looks like it will be less wear on it. (Actually, I'm gonna keep an eye on it to see if it holds up. I might experiment with a thin metal one instead.)


A scornful look from a black cat isn't required at this stage, but it seemed to be help.The infamous "clacker" in place. Cut from a surplus nylon Venetian blind slat.


The large letter/number combinations at the front of the hull were unit identifications in WW1. The smaller numbers at the back were tank serial numbers. I personalized the tank for my friend's kid by making his birthday the serial number and used a play on his name for the unit ID. I painted the letters and numbers using a very fine point brush and... yes... a toothpick.
The tops of the tracks are painted grey.I did add small driver shields and painted small slots on them.


The last thing I fixed was the machine gun. I really didn't like how the 3/16" dowel looked. To fix it I drilled a 1/16" hole in the center of it and then expanded that hole with a 1/8" hole (doing it like that prevented splintering) and then put a piece of 1/8" dowel into that hole.


After the painting was done, I gave it a coat of spray acrylic and then gave it a test run on the floor.


All in all, not so bad. Nothing too tricky (although there must be an easier way to make the clacker... just saying.) Without the paint, I think this could be knocked out over a weekend without any problem.


Here are the rough plans as a cutting guide. BE SURE TO SET THE IMAGE TO PRINT LANDSCAPE! The tank tracks should be a little over 8" from tip to tip. I tapered the back of my sponsons but like I said, I might add smaller guns at the rear on the next one. (And there definitely will be a next one.)


Friday, June 4, 2010

Making a Toy WW1 Tank (Part 3)


I want the tank to make a noise as it is pushed. This is the "clacker" idea I mentioned earlier. Looking at other toys and thinking about cardboard in my bicycle spokes (I never would have ruined a real football card) I knew I needed to make a geared wheel with something flexible that intersected it at a right angle. As the wheel turns, that flexible something would make a clicking noise with each tooth on the wheel as it passed.


I used a 1 1/4" hole saw on a 1/2" piece of oak. (What? Toy Making Dad using using real wood? Scandal! -I know, but in fairness, it was a piece of scrap and this part really needs to be made out of hardwood.) This fit perfectly in the space I had on the axle between the other two wheels.


I used to have a job where one of the "guiding principles" was "Why make it simple, when you can make it complex?" With that, I present the 5 step program that takes about 4 times as long to type as it does just to make the silly geared wheel:
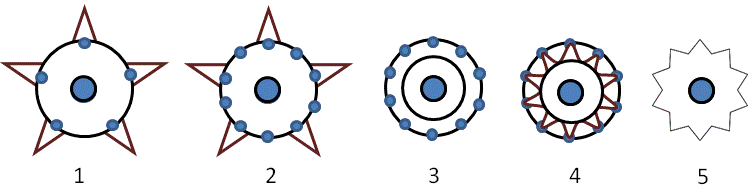
  1. Take a 1 1/8" in diameter by 1/2" thick wheel with a 1/4" axle hole and place it over a drawing of a five pointed star and mark the points of the star on the wheel.
  2. Give the wheel a turn so that those marks were now in the valleys of the star points, and then mark the points again.
  3. Draw an interior circle on the wheel at the depth you want each gear gear to be.
  4. Draw "v"s down from one point to the interior circle and then up to the next point for all ten marks.
  5. Carefully use a band saw or a coping saw to cut out the gear.


If you use the band saw, make a simple jig with a 1/4" dowel sticking up out of a board. Then set the wheel down flat with the dowel through the hole. Carefully complete the cuts by moving the jig into the saw and then pulling it back out, rotating the wheel to the next position and then repeating all the cuts until you are done.


This is what I ended up with. Pretty cool but still functional and sturdy. Since my wheels are inside the toy and I don't have a lot of extra room, I test fitted and assembled the wheels and axles before I glued the sides to the hull.

The 4,865th test fittingMmmmmm, glue sandwich...
I tested the clacker with a small piece of vinyl and I got the sound I was looking for. I won't mount the vinyl until the very end though. I glued and clamped the center hull to one side of the tracks and let it cure overnight. I painted the inside areas that I would not be able to get at once the tank was assembled. (I also gave that area a quick spray acrylic seal.) Then I put in the axles and glued and clamped the other track side to the hull.

I wouldn't be able to paint inside the wheel
 wells if I waited until the tank was done.
Clamped up and curing. I tested the alignment
 several times to be sure the tank rolled evenly.


In researching British tanks in WW1 there seems to be some real question as to exactly what color they were. Most of the museum examples around the world have them in either an olive green or a darkish brown. The brown is pretty classy honestly, and my next one will be that color but I went with the olive green for this one. Mainly because that is what I saw in my mind when I first started thinking about how to build this.

I did add white and red recognition stripes to the front of the tank because they were used in WW1 and on British armor up through the early part of WW2. While not to scale... they seem to class it up a bit. I used regular masking tape. (I would have used the blue painters tape... IF I COULD HAVE FOUND IT!!!)


So, all we have left are the sponsons with cannons and final assembly and painting.
(If you just can't wait... you can see the completed sponsons in the background of the picture above.)


Tuesday, May 18, 2010

Making a Toy WW1 Tank (Part 2)


I edited the tank image down to just the side view using MS Office Picture Manager but obviously, you can use any image manipulation software or the photocopier of your choice. I then resized it using PowerPoint because it gives a very easy inches scale to follow. (I used the profile I found on http://www.the-blueprints.com/ but I'm not showing it as part of the template I'll include in Part 3. As cheap as I am, I not willing to take other people's work and pass it off as my own.)


I decided to use some IKEA bed slats that I had been given by a friend. (These are not to be confused with the IKEA bed slats my in-laws gave me...) The slats are 3/4" thick and 2 5/8" wide. I cut two pieces about 9" long and then "sandwiched" both pieces together using double sided tape. I sprayed one side with spray adhesive, let it sit for about five minutes and then applied the image. (By letting it set up for a few minutes, it makes it easier to remove the paper later.) Then... off to the bandsaw and the belt sander!


If you can't get the cuts to be a smooth as you like either because of inexperience or having not the right blade; don't despair. Try and make "relief" cuts perpendicular to your main cuts. You can always smooth things later (especially if you have a wicked cool belt sander.)
These are the finished tracks. I drilled two 5/16" holes along the bottom that will hold the axles for the wheels. The holes are 2" apart on center and 5/16" on center from the bottom. (Did I mention how wicked cool belt sanders are?)


I cut the hull out of one piece of 2x3 (which we all know is really 1 1/2" x 2 1/2" grrrrrr). I had a general idea of what I wanted the shape to be, so I just drew it directly on the wood. Again, I'm not trying to make a scale model. I'm trying to make a recognizable toy. The picture above shows the axle holes already drilled, but actually I test fitted my hull against one side of the track to be sure my axle holes were in the right place before I drilled those holes.


Looking at historic photographs and line drawings gave me the general layout I was looking for.After cutting out the general shape, I test fitted it and cut the wheel wells.


I drilled a 3/16" hole right in the center of the front cabin of the hull (facing forward) about 1/4 deep. This will hold a dowel that will be the hull machine gun. You could make the dowel 1/8" but it might be a little fragile for how it is going to be played with. Besides, I've seen some pictures and documentation that said this machine gun was sometimes a "Lewis Gun" which had an oversized cooling sleeve around the barrel.(Hey, I thought you said you said you weren't trying to make a scale model and that you were just trying to make a toy... - QUITE VOICES! I have to use my History degree every once in awhile!!!)


Okay. Let's test fit it and see how we are doing. I took some 1/4" dowels and slipped 1 1/4" in wheels on them. These will go inside the tank body so that they can't be seen from the outside. (By the way, some of the wheels marked as 1 1/4" at craft stores are simply not that size at all. A reliable source for the correct size wheels is http://www.craftparts.com) 

Grab the double face tape and then line everything up, give it squeeze and see if it rolls.


The space is going to be tight for the "clacker' I want to place between the wheels, but we can still give it a try.It rolls well and is starting to take on the classic tank look I'm shooting for.


So far, so good.


Saturday, May 1, 2010

Making a Toy WW1 Tank (Part 1)


The origins of toys I make generally fall in three categories:
  • Builds from online plans or more likely books I've collected.
  • Trying to mimic a folk toy I've come across.
  • Just making them up as I go. (The ever popular "proof of concept")


I've made several toy tanks over the last couple of years. I think the best one I made was a WW2 M3 (also known as a Lee tank) that I made for the son of a friend of mine. It clearly fell into the third category. (It was built before I figured out the digital camera, so that is why the picture looks like it was taken in a Tunisian sandstorm.)


Well, my friend is coming back to the US this summer after being stationed in South Korea, so what better way to say welcome home to him and his son than with another tank?


So, let the "let's just start making this up as we go" process commence. We already have the idea - a tank. But what kind? I know that I'm not making a scale model. What I'm trying to do is make a toy that has the look of a tank and is fun to play with.


About a year ago I stumbled across the Homer McNeil Wooden Toy Collection at the Ames Historical Society's site. I was blown away because during the 1940s Mr. McNeil made toys for his children out of food crates and office equipment (which sounded strangely familiar.) It really struck a chord with me that his kids held on to the toys for all these years. They were obviously made with love and meant a lot to his kids. If you get a chance, click on the link above and give it a look. It is well worth it.


One of the toys is this "WW2 Tank." Now, it really isn't a model of a particular tank, but you can tell just by looking at it that a) it is indeed a tank and b) that it is meant to be played with. It is a toy. Those are some of the qualities that I want to try and get.


The trapezoid lozenge look to the tracks is really reminiscent of a British WW1 tank. It is a really distinctive feature of those tanks. Another interesting thing about those tanks is that they didn't have a turret on top of the tank, but rather had their main armament in "sponsons" mounted on the sides of the tanks. Besides actually being a naval term, I think that this gives them a "land battleship" appearance. It also led to "male" and "female" models of the tanks. The males had six pounder cannons in the sponsons and the females mounted machine guns in those positions. (And yes, they built some with male AND female sponsons on either sides of the same tank, but I'm gonna take the high ground here and for once in my life not make a smart-alecky comment about it.)


Okay. So I'm decided on a WW1 British tank. I'll make it a male tank so it will have guns that can be aimed on both sides. I think it will have a good retro look. I'm also thinking about having some sort of clacker attached to the underneath of the tank to make a clacking noise as it is pushed across the floor. (Because as we all know, "The tracks on the tank go 'clack, clack, clack', ...'clack, clack, clack')


So, like I said, I'm not trying to make a scale model, but I do want it to be recognizable. So I need the general proportions and I need to decide on the scale I am going to build. I recently came across a site that I highly recommend  - http://www.the-blueprints.com/. The Blueprints site contains THOUSANDS of line drawings like the one below. This drawing gives me a pattern that I can use to cut out the logenze shaped tracks and gives me the proportions I need.


The images can easily be resized to the scale I want.

Monday, April 19, 2010

Making a Toy Cannon (Part 2)

Part 1|Part 2
I've only ever had a few life changing purchases in my life (eg my first car, my wife's engagement ring, that jar of boysenberry jam a few weeks ago...) but my drill press is definitely one of them. The question isn't "What can you do with a drill press?" The question is "What can't you do will a drill press?" (So far, flossing and baking a cake are the only things I've failed at with it.) It has opened up all sorts of toy opportunities for me.
First rule of the drill press - don't be an idiot. Keep that in mind and no one will get hurt. Keep your hands away from the spinning and cutting parts and CLAMP EVERYTHING you are drilling. The bits can create a tremendous amount of torque; don't kid yourself into thinking you can hold something in place while you are drilling it. If you can't clamp it directly, take a minute and make a jig. It is well worth the effort.
Since our cannon has a solid body, we have to bore out the barrel to make it:
  1. Look cooler and
  2. Actually be able to shoot stuff!
Since the barrel has such an odd diameter, we can't just use a spade bit to drill a hole to place it and then lock it in place with a dowel. Instead I lined up two pieces of scrap and drilled a 3/16" hole through both of them. When the boards are upright, the barrel can be locked in place by a dowel straight through one board, through the side of barrel (the trunnion holes) and out the other board. This will keep it locked in place while you drill away.


Here are the measurements that determined what size holes I drilled.
  • The total length of the barrel is 3 7/8"
  • The barrel at its most narrow point is 1/2" in diameter so I went with a 3/8" bit for the bore.
  • The depth of the 3/8" bore hole is 2 1/4"
  • The plunger hole is 5/32"


With the jig firmly clamped to the work surface and the two pieces of the jig clamped to each other around the barrel we are ready to drill.


I drilled the bore first and then I just unclamped the jig and spun the barrel 180 degrees around the trunnion dowel and made sure I was lined up for the plunger hole before I clamped everything again. I replaced the 3/16" dowel as well since the bore passed through it. Hold on to the dowel pieces though, we have use for them in a few paragraphs.


The hole through the breech end of the barrel needs to be big enough that a 1/8" dowel will pass smoothly though it, but not so large that the spring that will live inside the bore could slip into it at all. I drilled a 5/32" hole through the breech until it was all the way through to the bore.


The last bit of drilling is to make a 1/8" hole in the center of a 1/4" dowel. This will be the plug on your plunger and it will live inside the bore. Again, a simple jig is in order. Just drill a 1/4 hole in a board and put a piece of dowel in it. Line it up, clamp it and drill a small hole.


Use epoxy or your favorite polyurethane glue to attach a piece of 1/8" dowel into the hole you drilled in the dowel plug. Make sure you have a good fit. I even lightly scored the 1/8" dowel to give a little more surface area for the glue to adhere to. Let it dry for the full curing time. You want this to be as solid as possible. After it dries, smooth and round off the top of the plug and test fit your pen spring. You might want to flair out the breech end of the spring to be sure it will stay clear of getting in the hole intended for the plunger.


Use a round file (which my dad always called a rat-tail file) to smooth out and slightly enlarge the bore. Take those scrap pieces of 3/16" and glue them into the holes of the side of the cannon. It's fine if they are too big right now because you can trim them to length later. After they have dried though, you'll want to use the file to be sure no glue or pieces of these dowels intrude into the barrel. For the cannon to work its best, you need a smooth bore.


Okay, you are in the home stretch now. With the spring in place, slide the plunger down the bore and out the breech hole. Pull the dowel back and forth a few times to be sure the plunger operates smoothly and the spring is not catching on anything it shouldn't. File and sand as needed. When you are happy with everything, place the bead you are using for the (ooooh, more cannon vocabulary!) cascabel (also known as the round thingie at the end of the cannon) on to the dowel. Pull the dowel back just to when you start to feel that the spring is engaged, and then mark the dowel where the back end of the bead is leaving about a 1/8 - 3/16" gap between the front of the bead and the back of the cannon. Cut the dowel where you marked it and then epoxy or polyurethane glue the bead to the dowel. Let it set up completely before you test it out and make sure that while it dries, it isn't gluing itself to back of your cannon.


Here is the cannon "at rest."
The dowel goes completely through the bead.
(Note the gap between the bead and breech)
Here is the plunger pulled back to its maximum.
It doesn't take much to fling a little ball.


Time to take it out to the test range. I used 1/4" beads and small piece of 1/4 dowel shaped to look like an artillery shell. The range on this test make it seem like this really zings the projectiles, and it sort of does, but that target was really close. When I tested these for distance both types flew a little over 9' 6".


Since everything worked I finished up the kit pretty much as advertised except that I added spoked wheels that I made and put some clementine box wood over the trunnions to allow the barrel to pivot but still stay attached to the carriage. I painted the cannon, carriage and wheels with acrylic craft paint and finished it with polyurethane.

Although I used a $1 kit for this, any piece of dowel more that 1/2" thick could be used following the same plans. The projectiles are really light, but also very small, so don't make this for really little kids. Make sure that whoever plays with it knows you could hurt someone's eye with it and never to point it at anyone. I think that the scale is a little big for 1/32nd soldiers, but not so huge that it looks out of place and couldn't be used.


The finished cannon in all its glory.Remember -
Treat every cannon as if it was loaded.
Making a Toy Cannon
Part 1|Part 2

Just Saying...

While we don’t necessarily need more objects, we just might benefit from more making.
- John Dunnigan

Followers

About Me

My Photo
Regular guy who likes to make stuff who lives with a very patient wife, three daughters and three cats.